
|
603-630-5658
|
|
tinypontoonboats@gmail.com
|

|
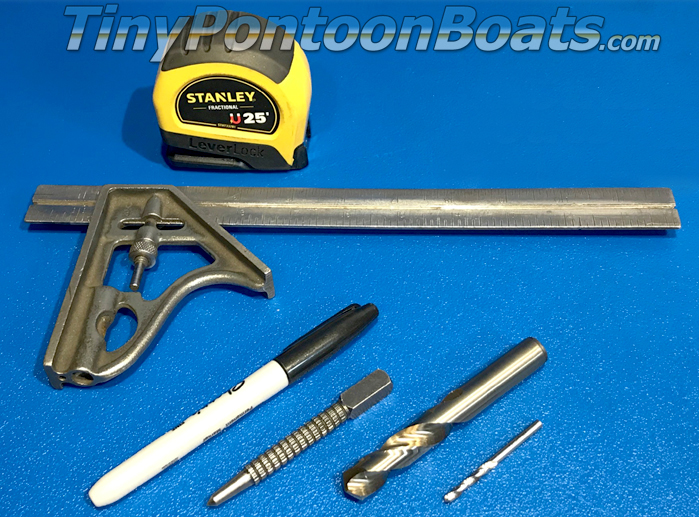
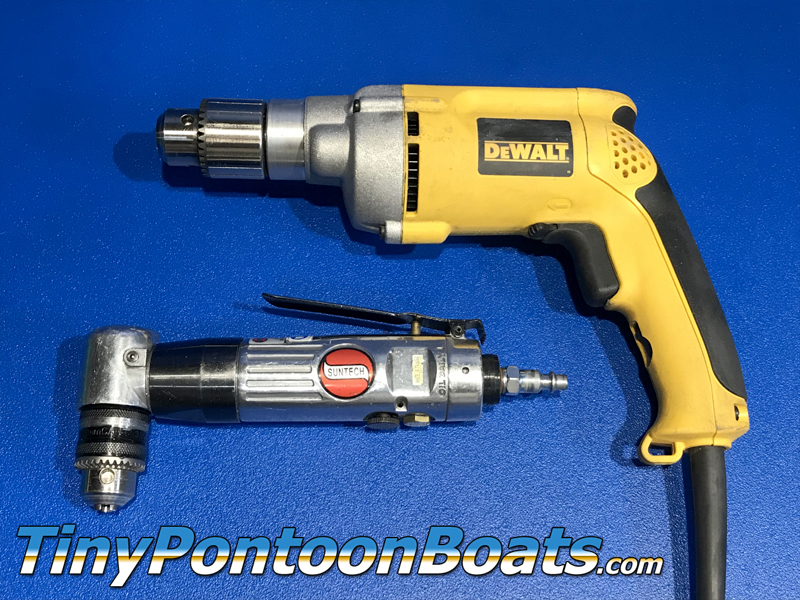
REQUIRED TOOLS
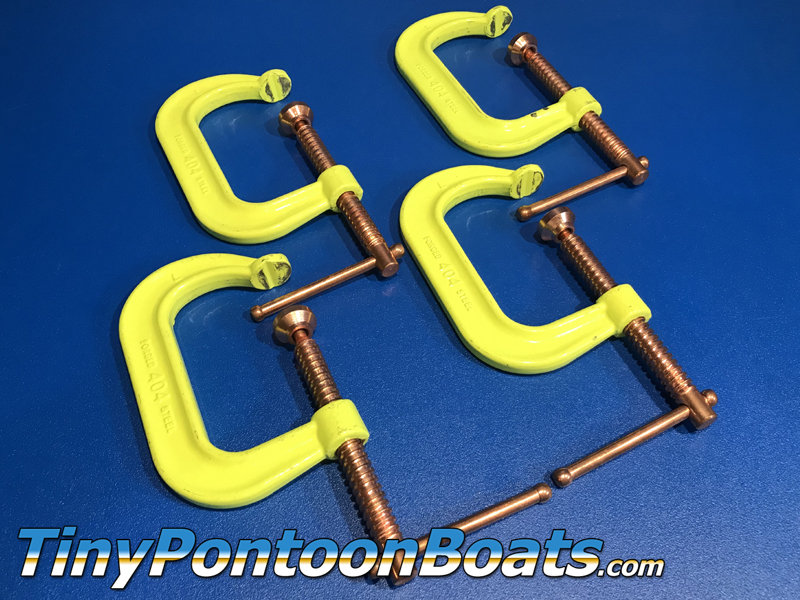
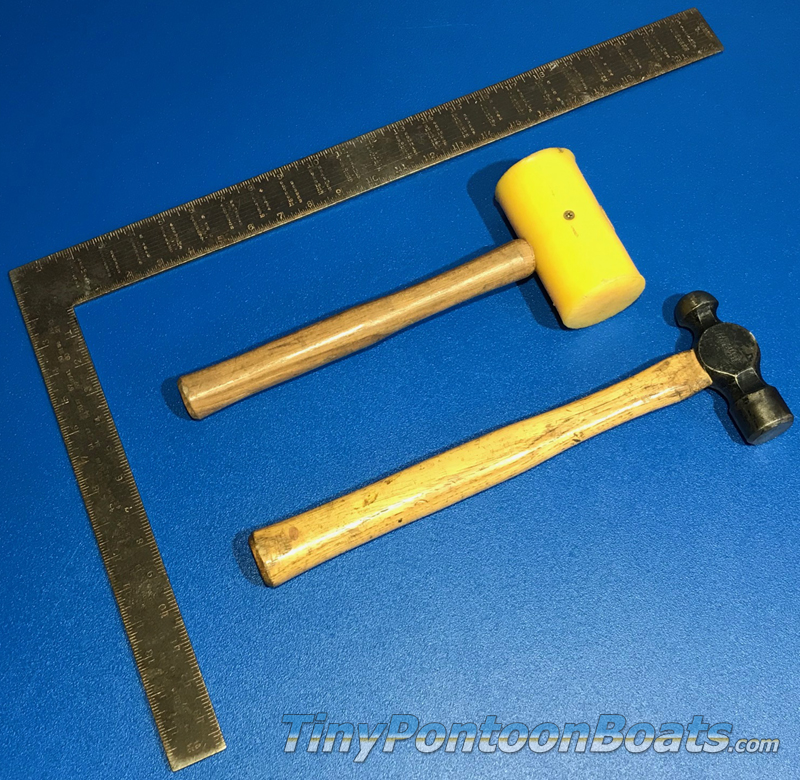
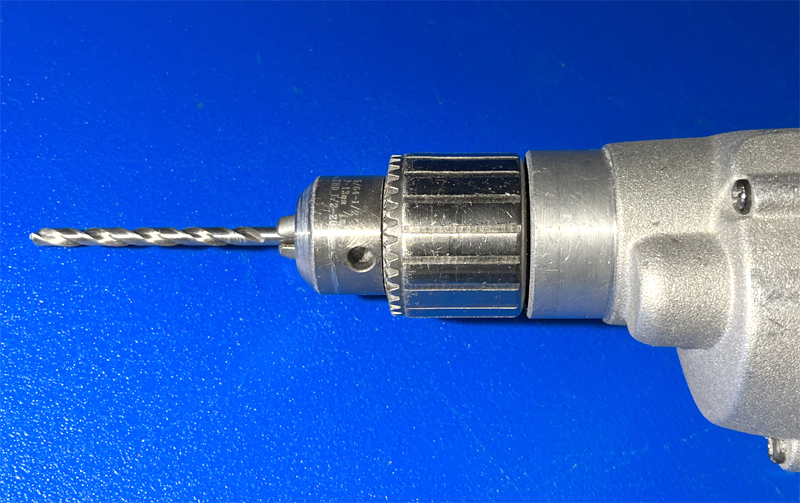
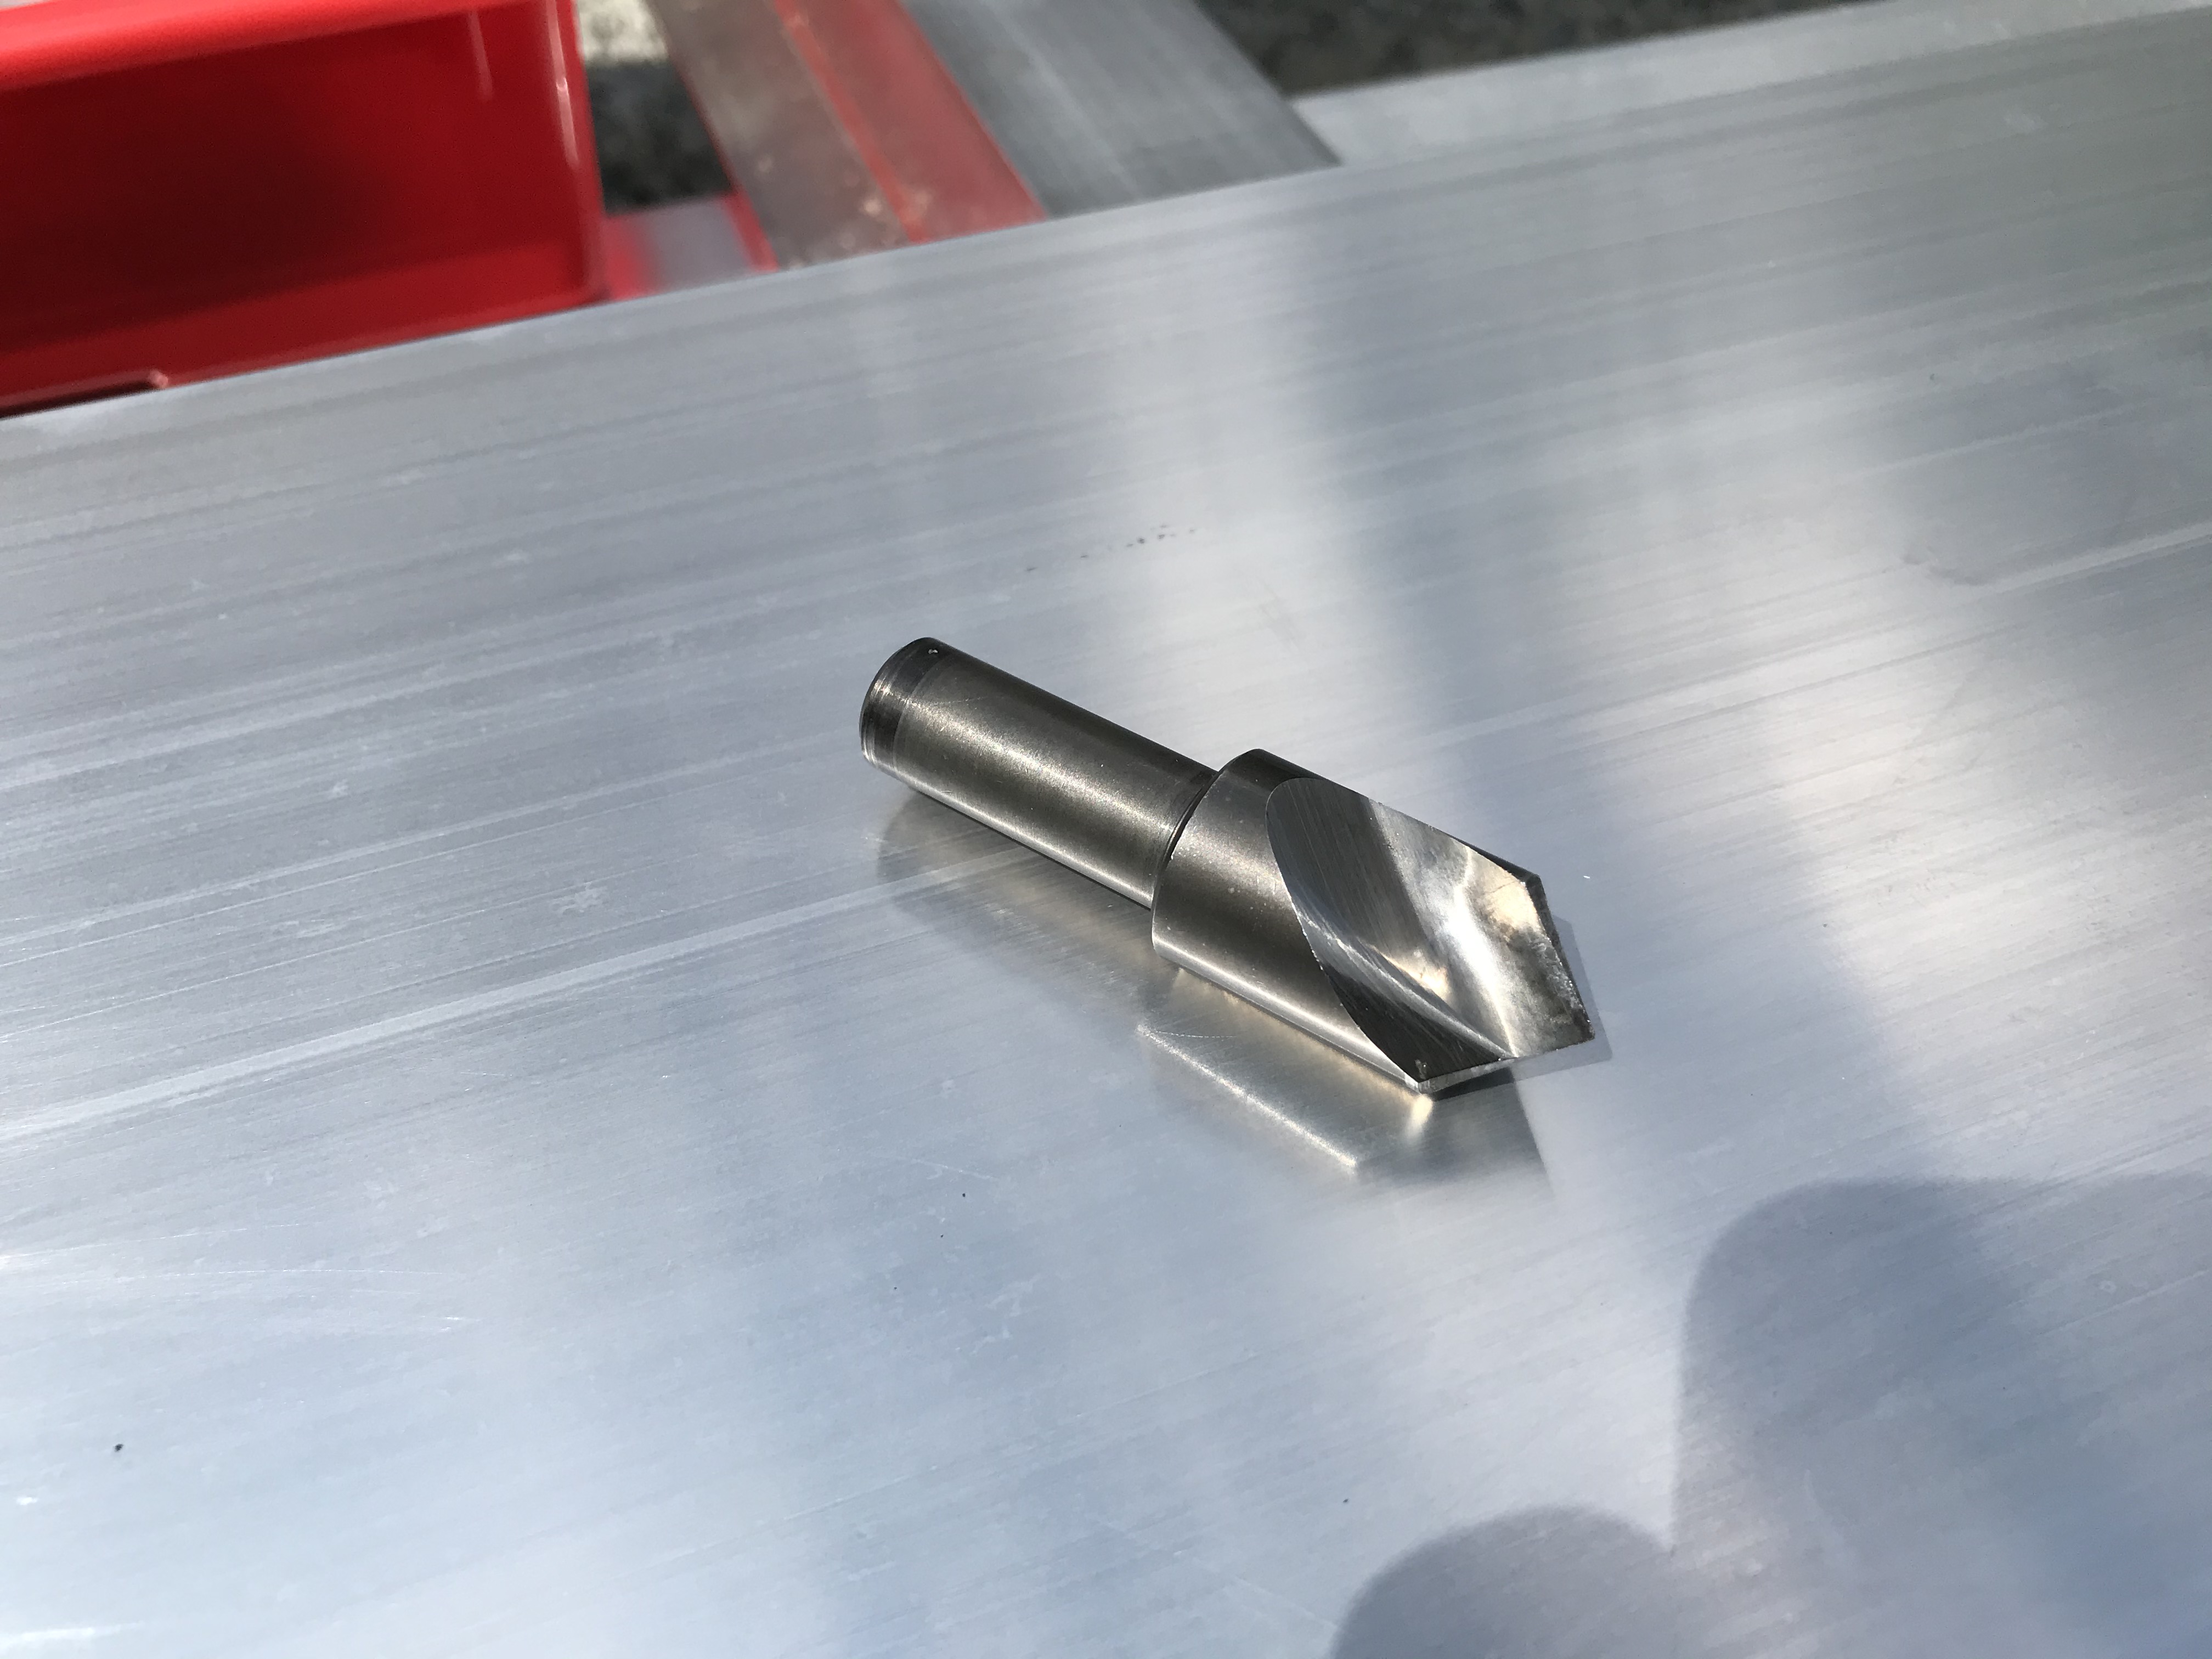
Installation of our aluminum decking packages require a few basic tools, as well as a couple specialized tools. Below we have provided a list of everything that you'll need, as well as a part numbers and links to where you can get the specialized tools from McMaster, which is a reasonably priced industrial supplier. Click on the part number to view the item on the McMaster website. Many customers will already have the majority of these tools, if not all of them. These tools (other than perhaps a rivet gun) should be stocked at your local home supply or hardware store as well. Please see the section below for rivet gun recommendations.
|
|

|
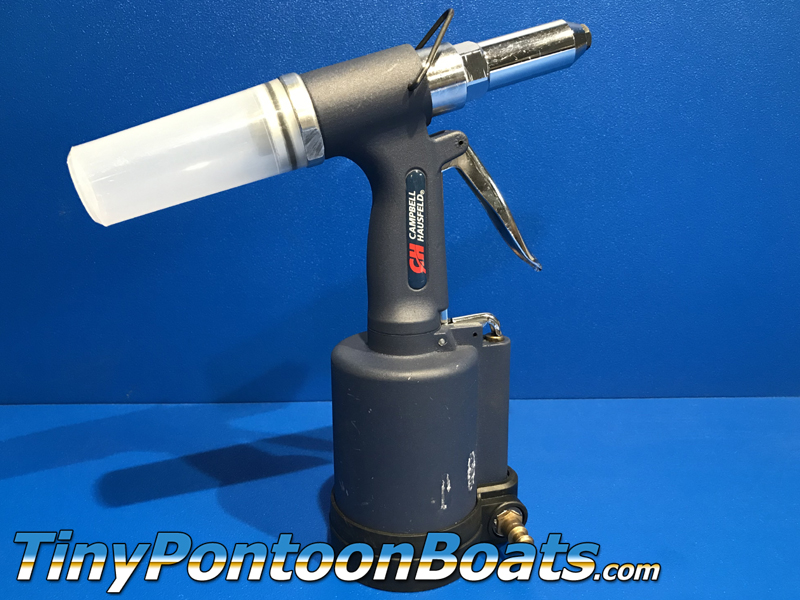
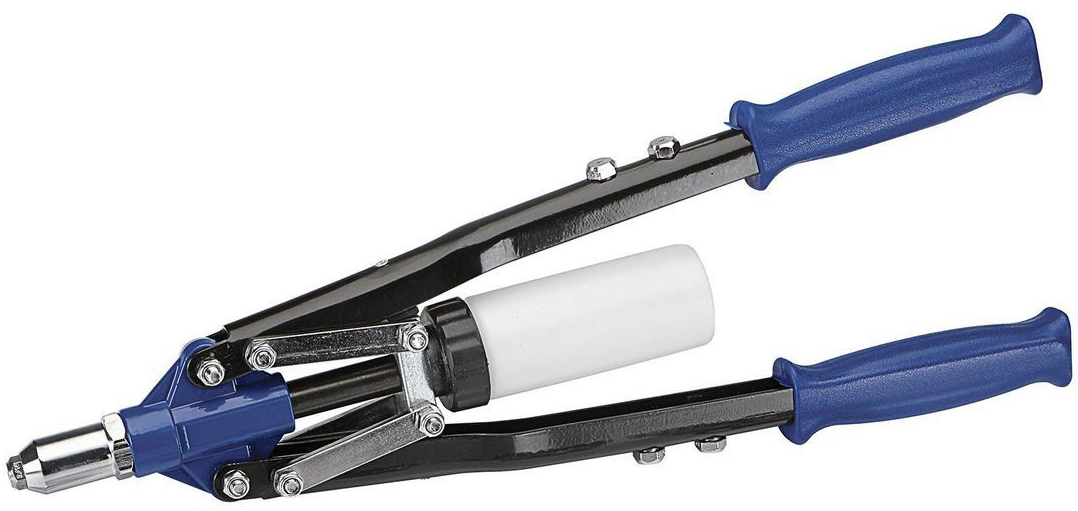
RIVET GUN RECOMMENDATIONS
Decking kits for our boat and raft kits with 27" wide floats requires installation of 128 to 230 rivets. The rivets are 3/16" diameter (pull pins are considered 1/8" - actually measure 0.12"), 18-8 stainless steel, which is a tough material, and requires considerable force to install. When installing one of our decking packages, we strongly suggest a powered rivet gun, or at least a rivet gun with long handles if using a manual tool. Can you assemble one of our kits with a simple one-hand manual rivet gun? No. The reason is that you have to be able to reach into the recess of each hat channel crossmember to install the rivets, so that simply won't work. If you don't already have an appropriate rivet gun, we've provided a couple recommendations. Click on the pictures to be brought to supplier links for either option.
PITTSBURGH TOOLS MODEL 58612: If a powered rivet gun isn't an option, a 2-handle manual unit is the way to go. It's able to reach installation locations on our kits and the 2-handle design allows you to have the leverage needed to install our stout rivets. We like this model hand riveter as it has long handles and is reasonably priced at Harbor Freight. For some boat kits, you may have to remove floats to reach the outermost decking rivets.
|
CAMPBELL HAUSFELD MODEL TL053900:
This is the rivet gun that we use here at Tiny Pontoon Boats and it's never let us down. Other brands and models will work just fine, but we really like this gun. For the outermost rivets for our decking kits, the white plastic pin catching cup has to be removed, but this doesn't hinder the use of the gun.
|

|
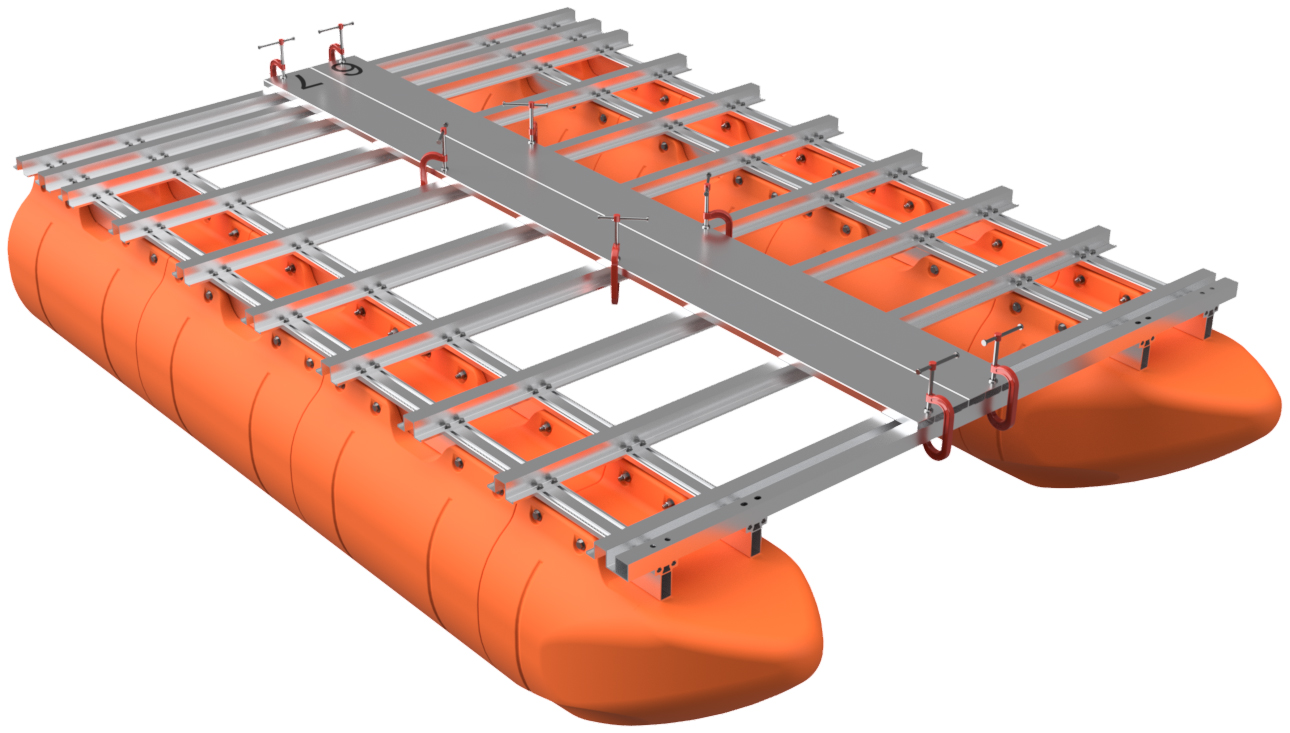
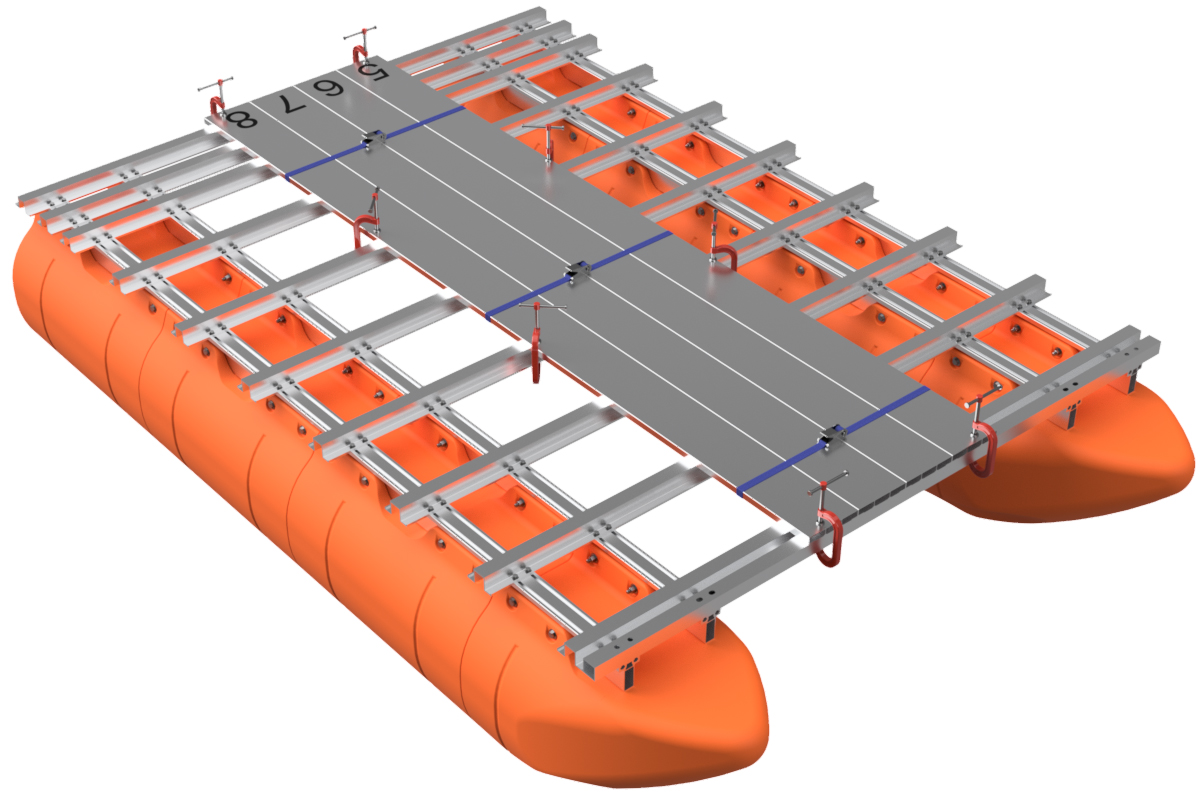
STEP 1
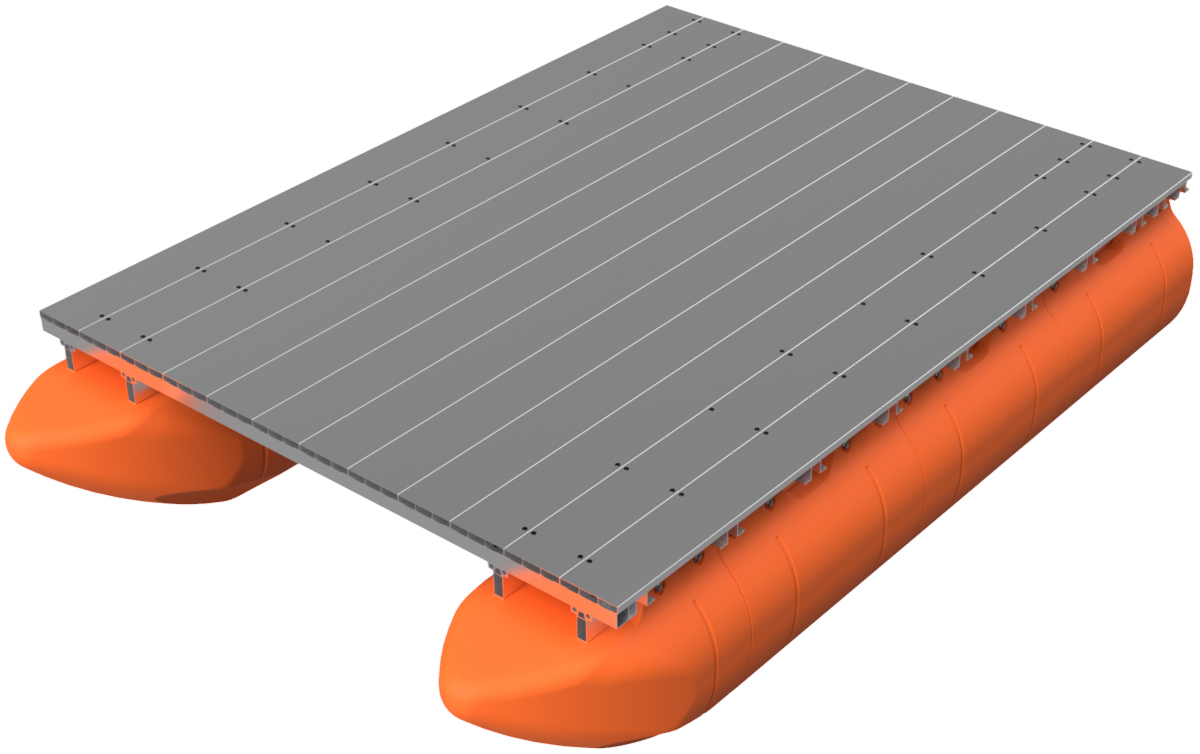
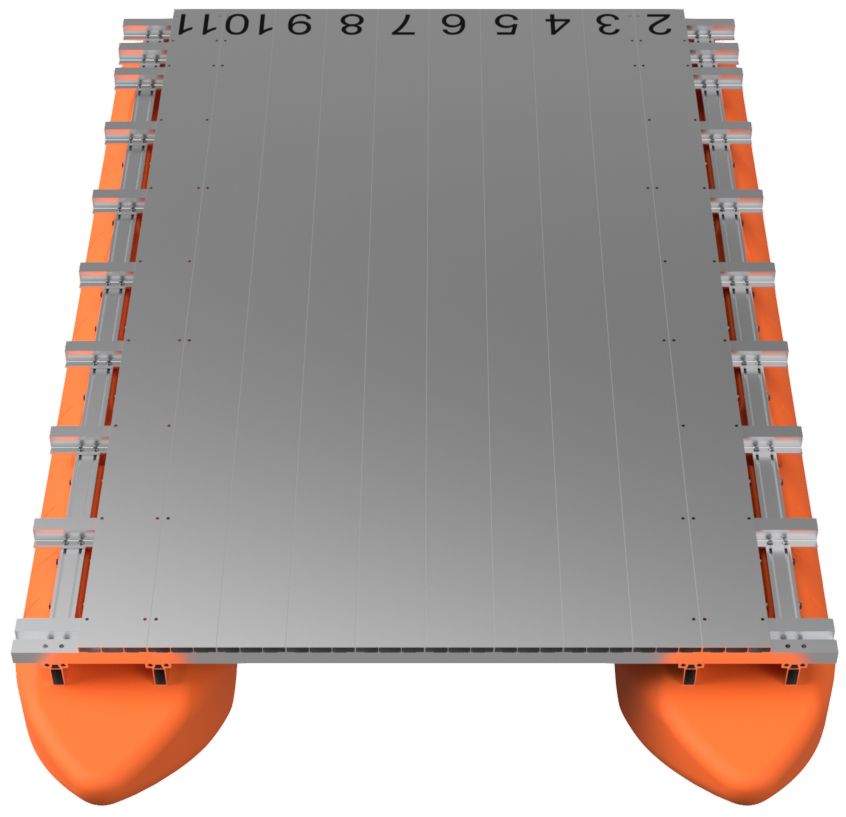
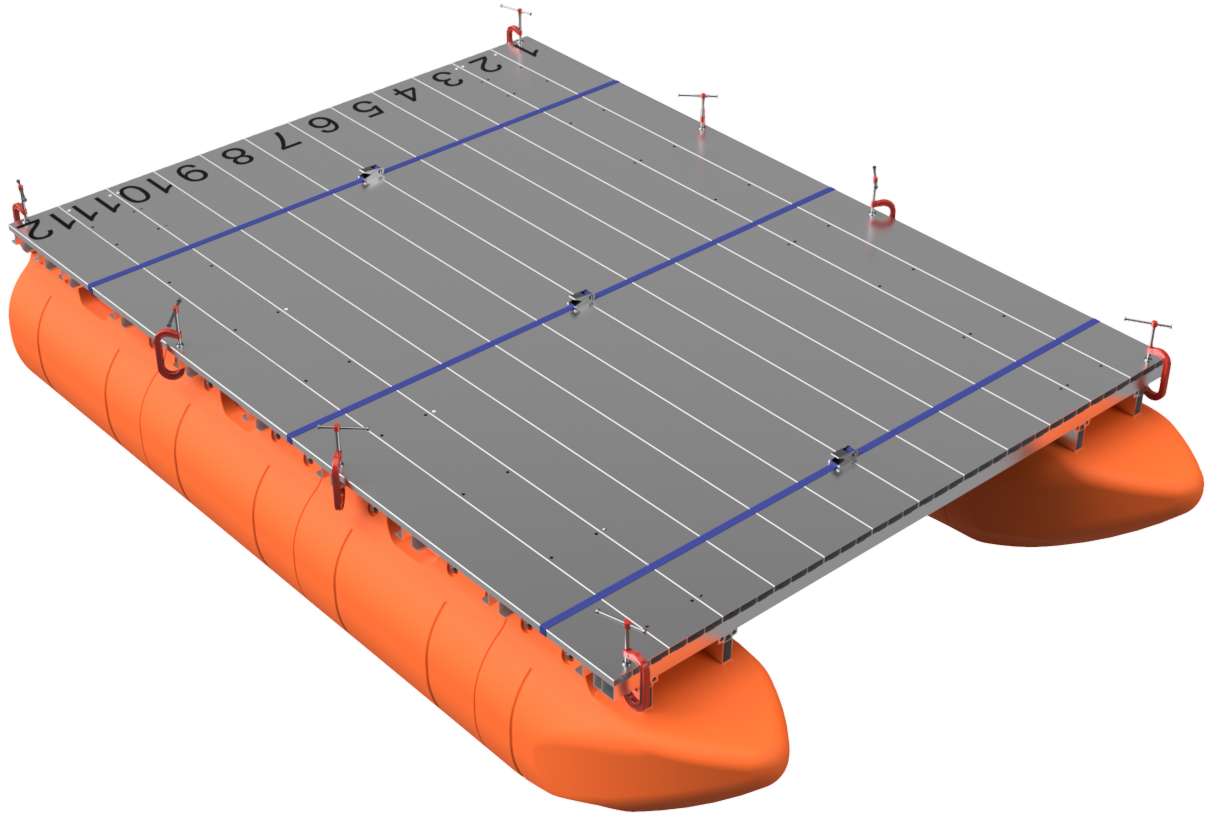
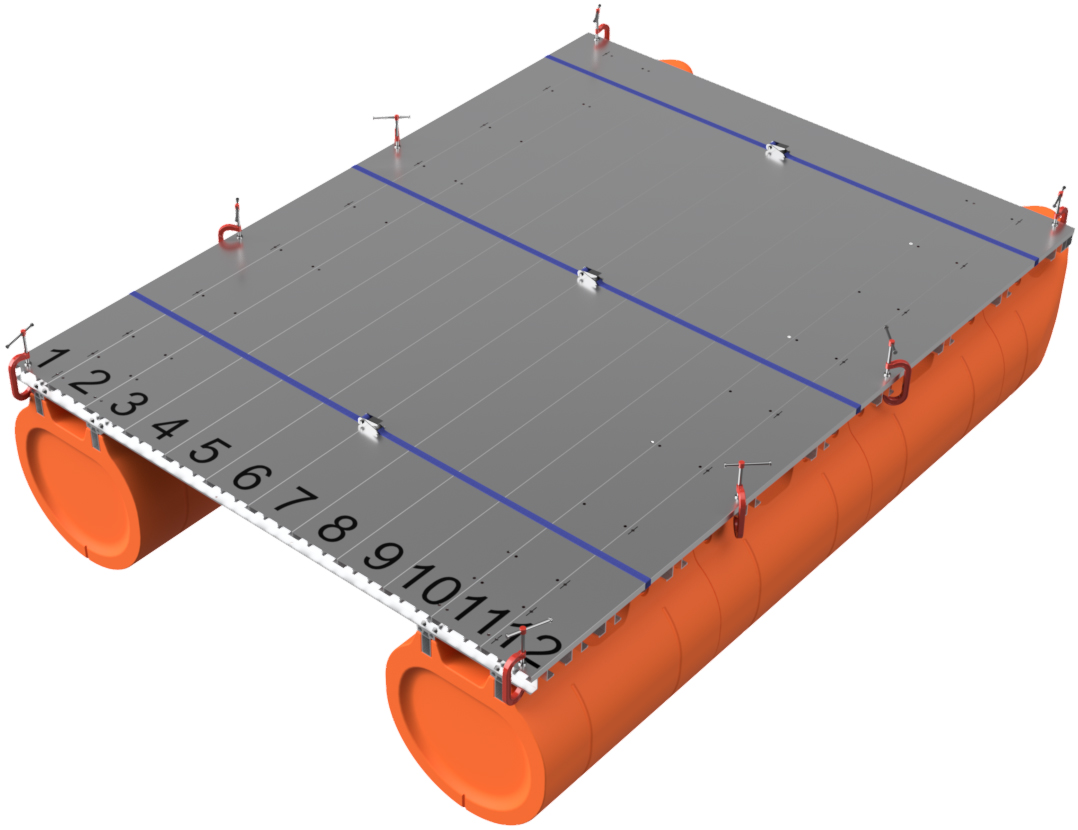
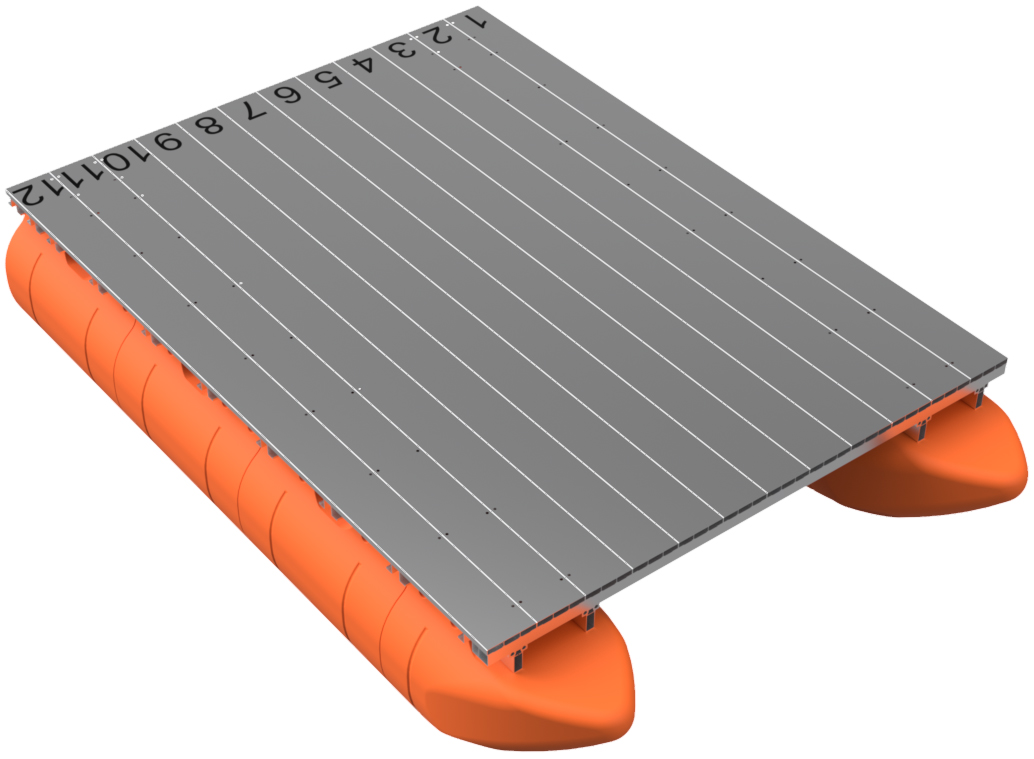
Please be aware that this set of instructions covers our full line of boat and raft kits that use our 27" floats. This includes kits with 7'4" and 8" wide decks. Any required procedural variation will be pointed out as we move forward.
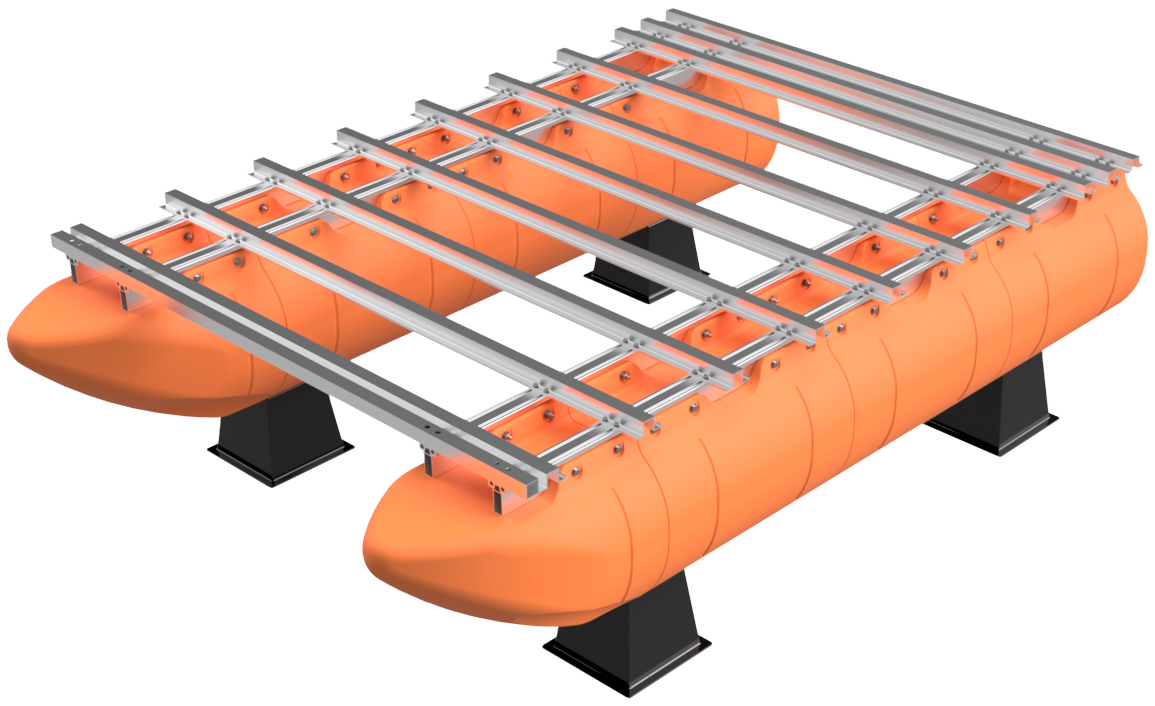
Place your frame and float kit in a flat area and wipe the top of the crossmembers with a rag to ensure there's no debris from the frame assembly. During the installation of your decking package, you will have to go under the boat to drill holes and install many rivets, so if possible, we recommend putting the boat on spacers to raise it off your floor or work area to make the project more comfortable. When we build our small boats, we use a set of pontoon boat storage blocks from Pontoon Stuff. |
|
|
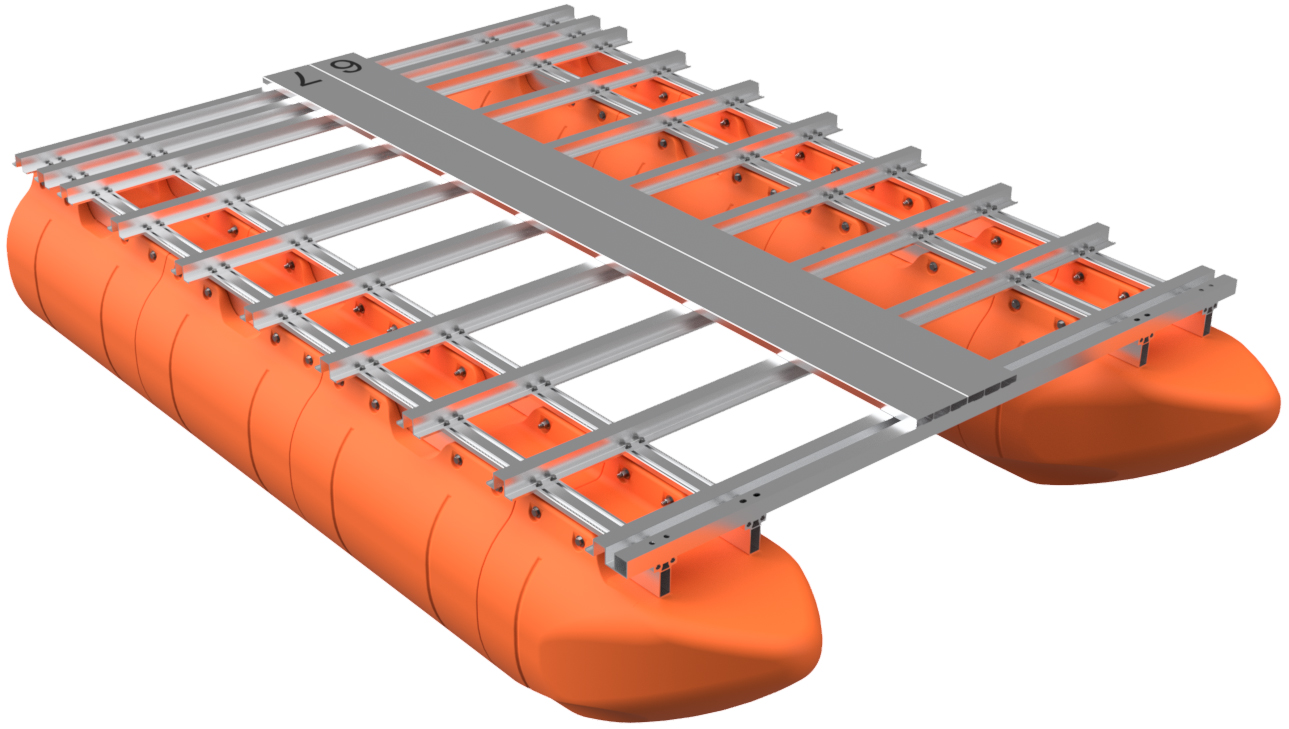
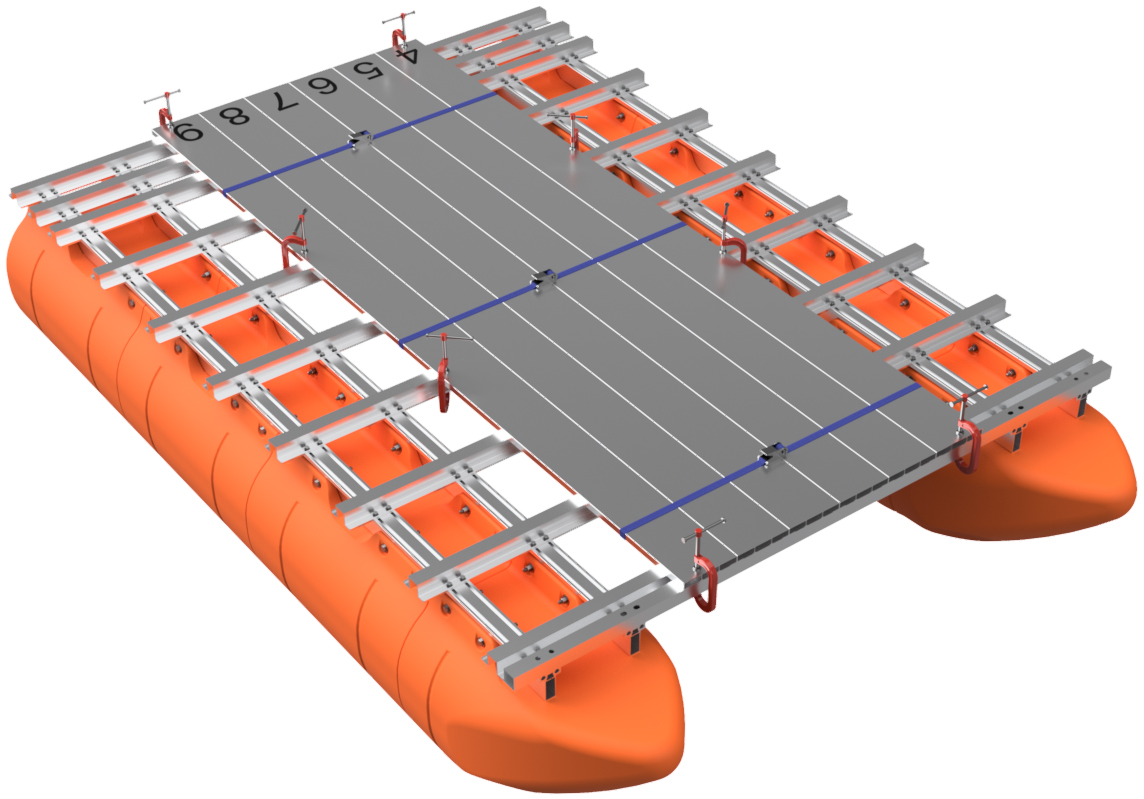
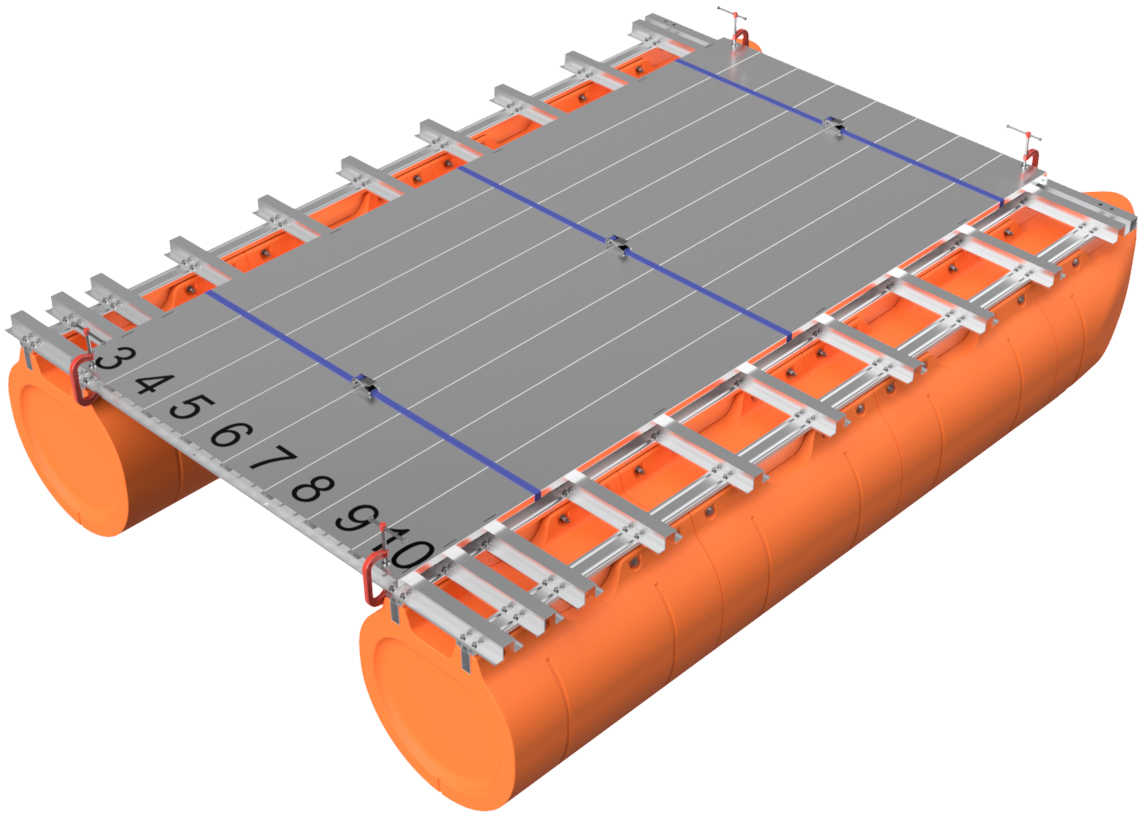
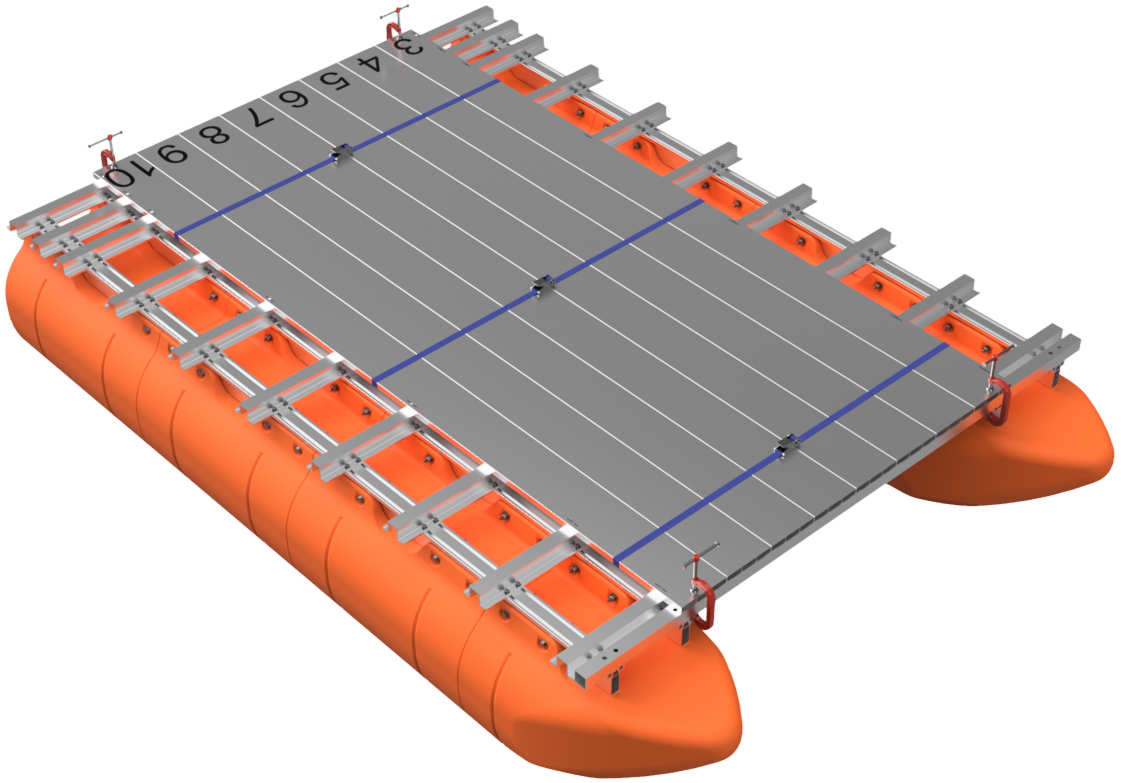
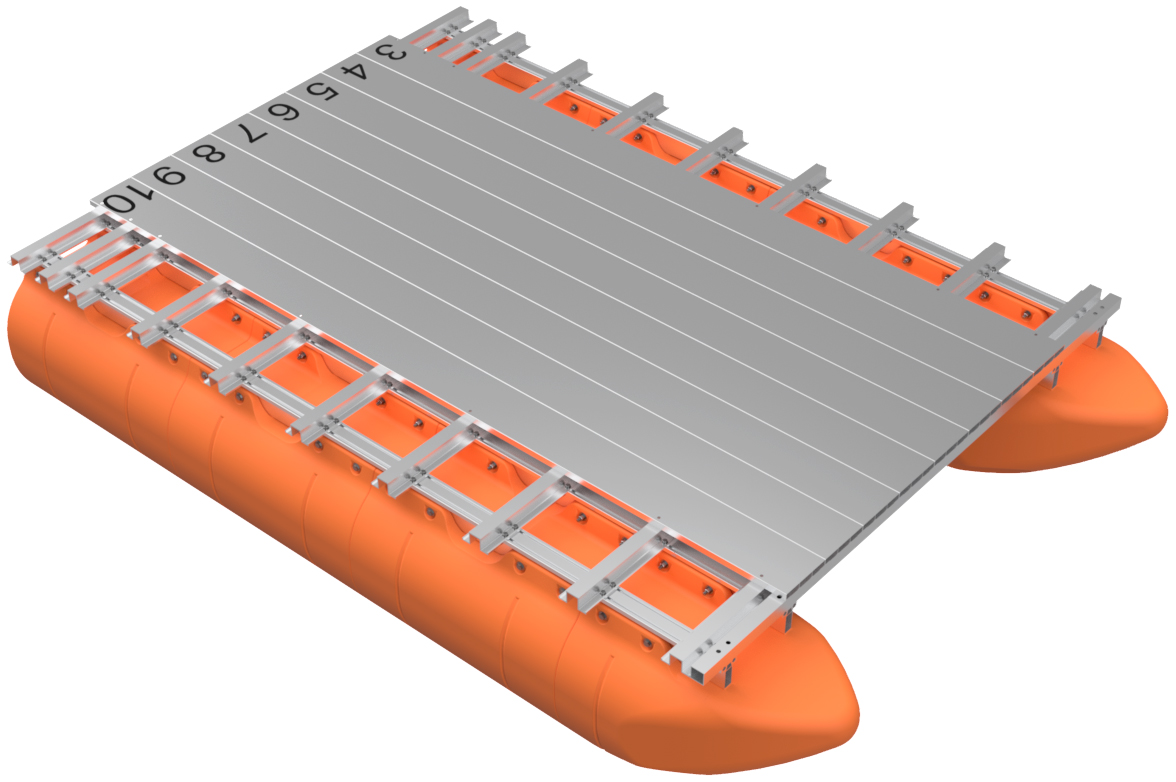
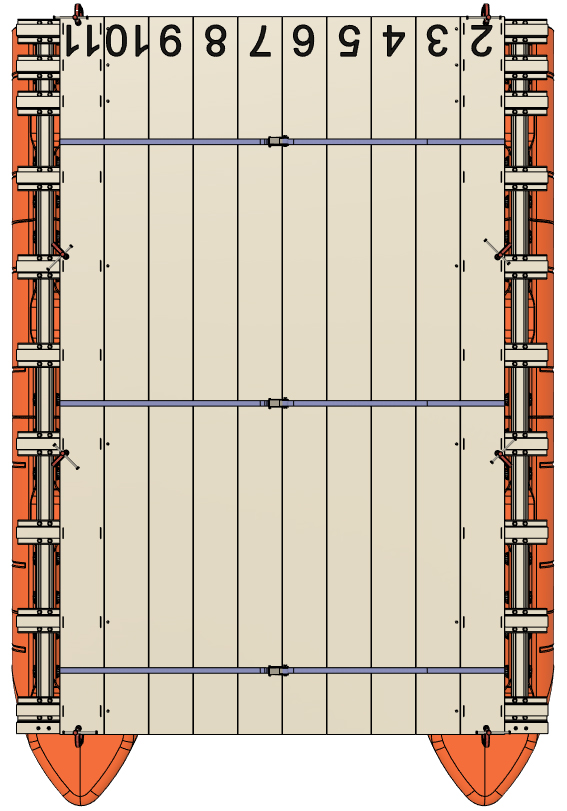
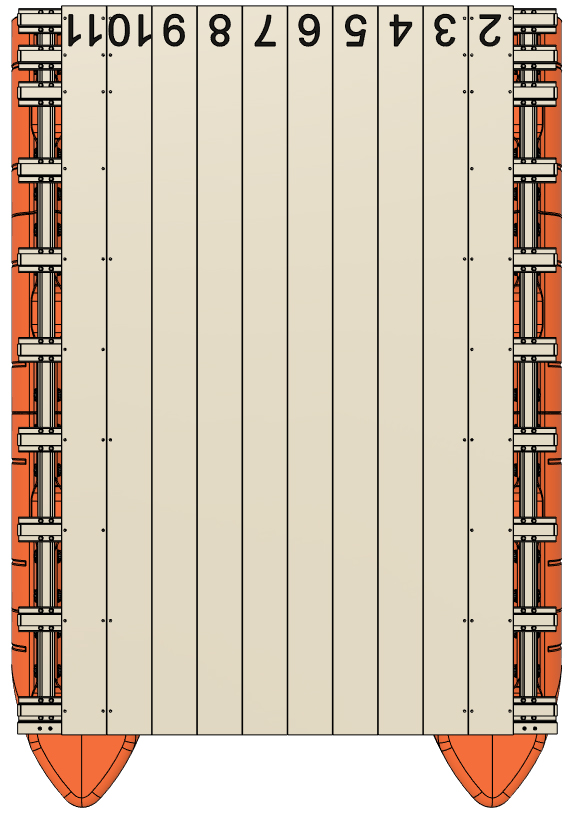
STEP 2
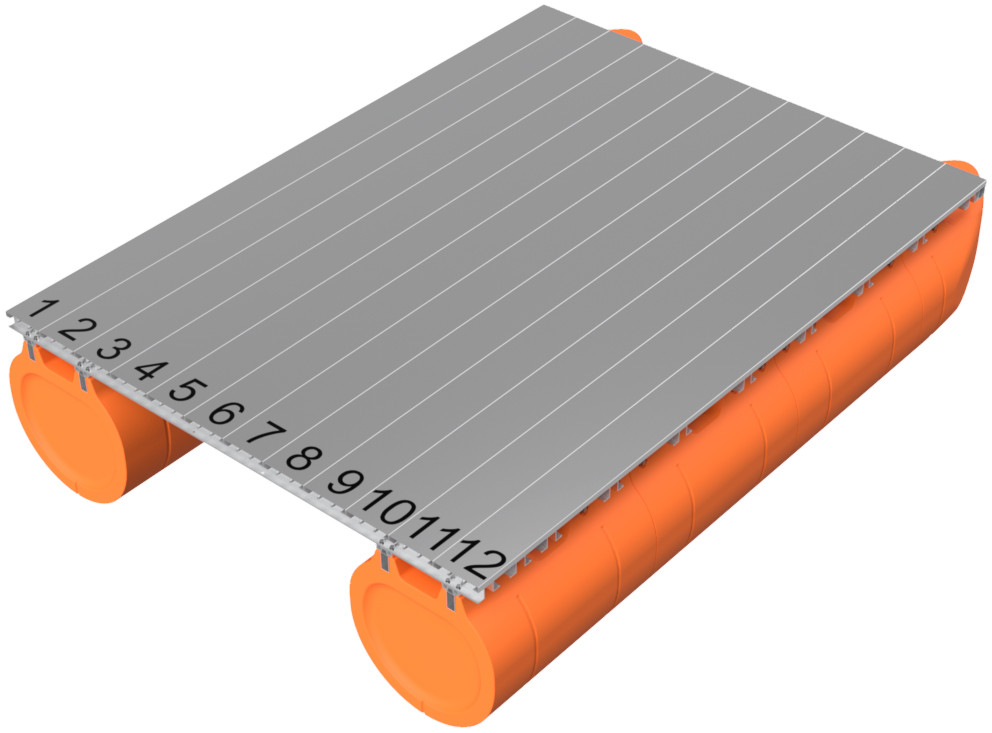
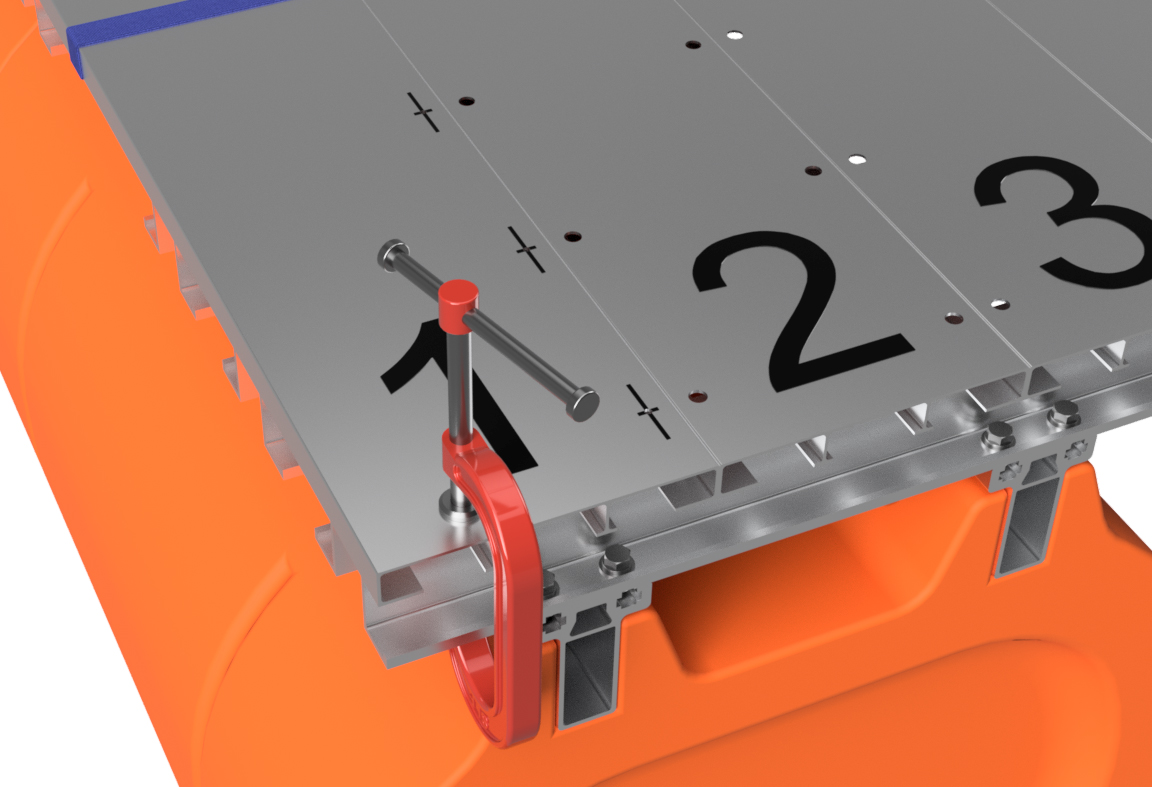
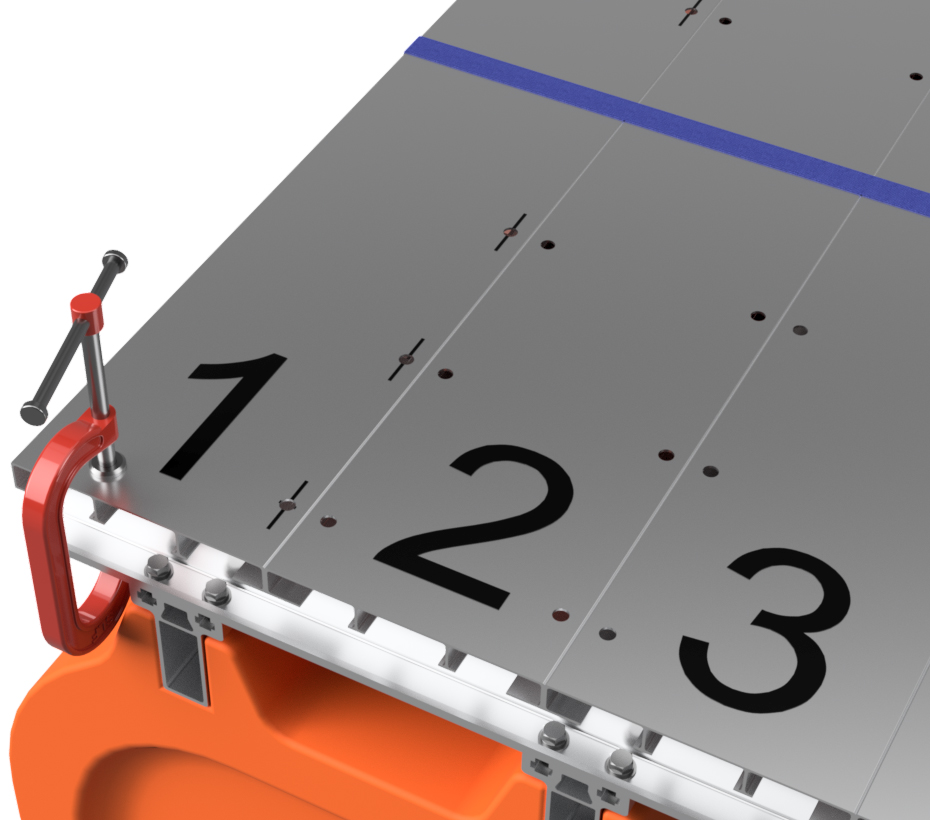
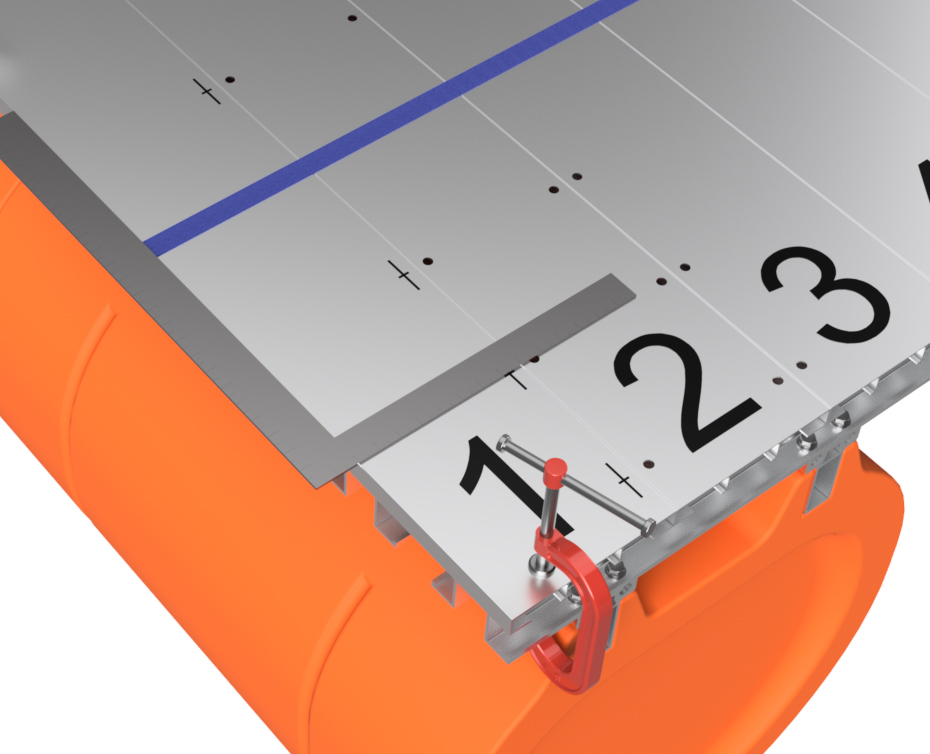
Place all of your aluminum deck planks on top of your boat or work platform. With a marker, number the planks 1 through 12 for 8' wide decks, or 1 through 11 for 7'4" wide decks. Move your crossmembers to one end of the vessel slightly and write the same numbers on the crossmember nearest the end you wrote on the deck planks. Lacquer thinner will wipe off the ink on the deck planks after assembly, or you can write on painter's tape and peel off the tape when completed.
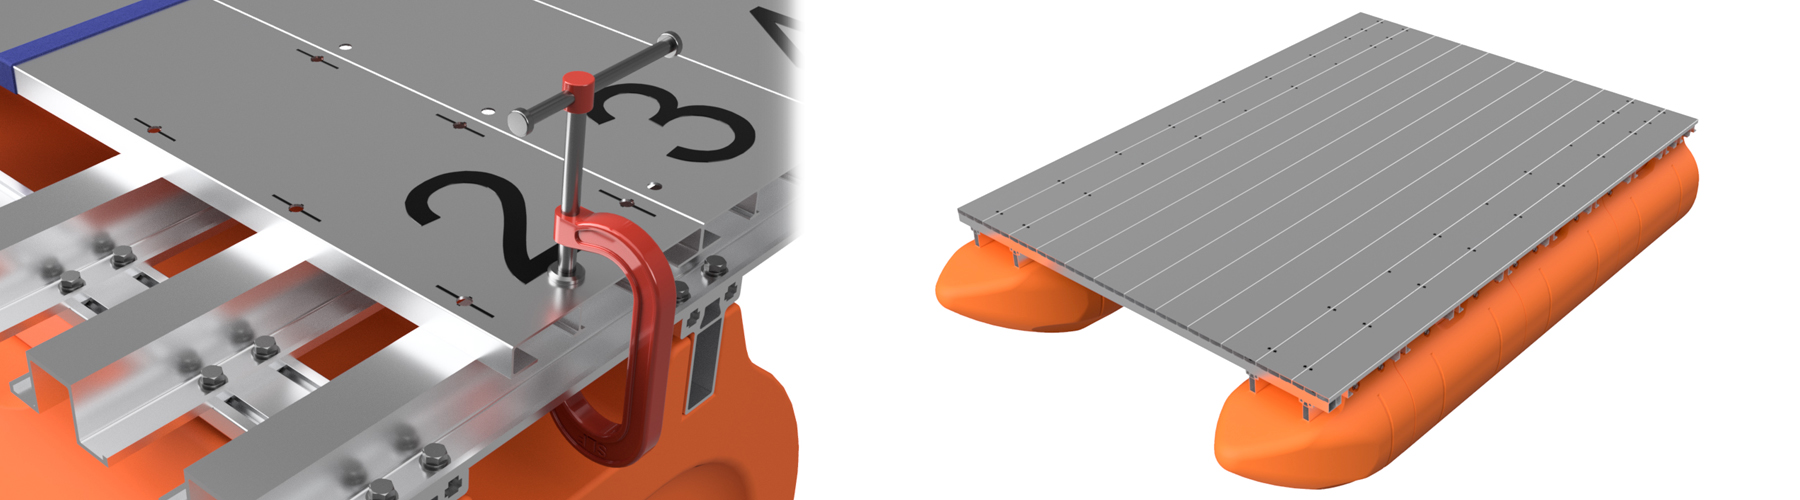
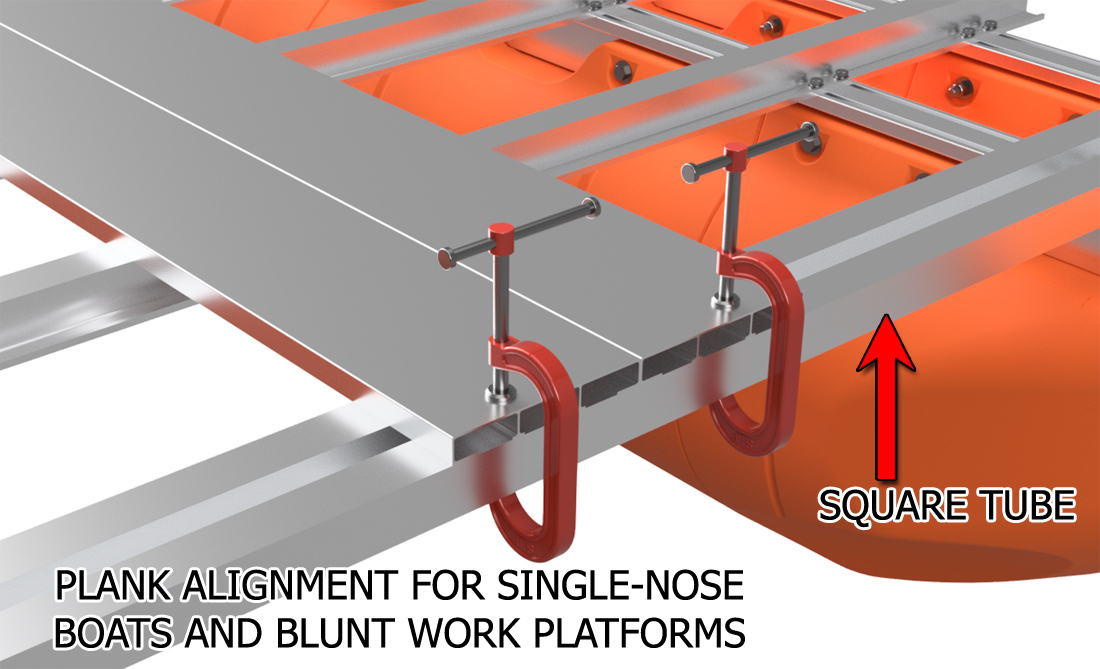
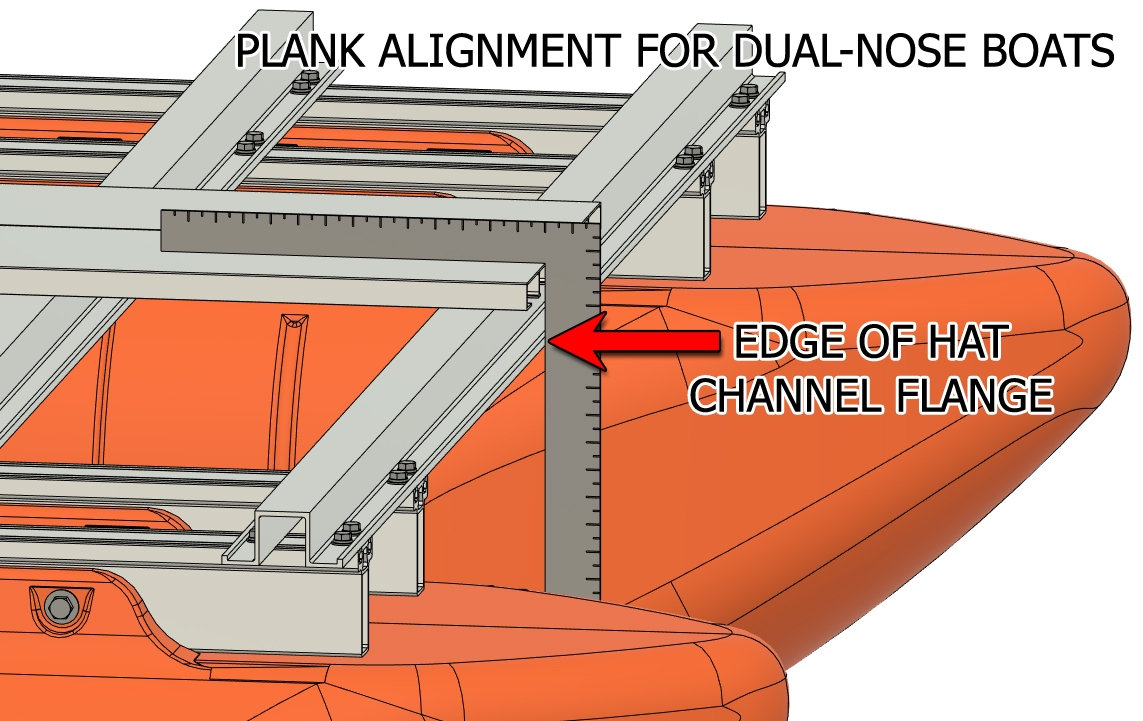
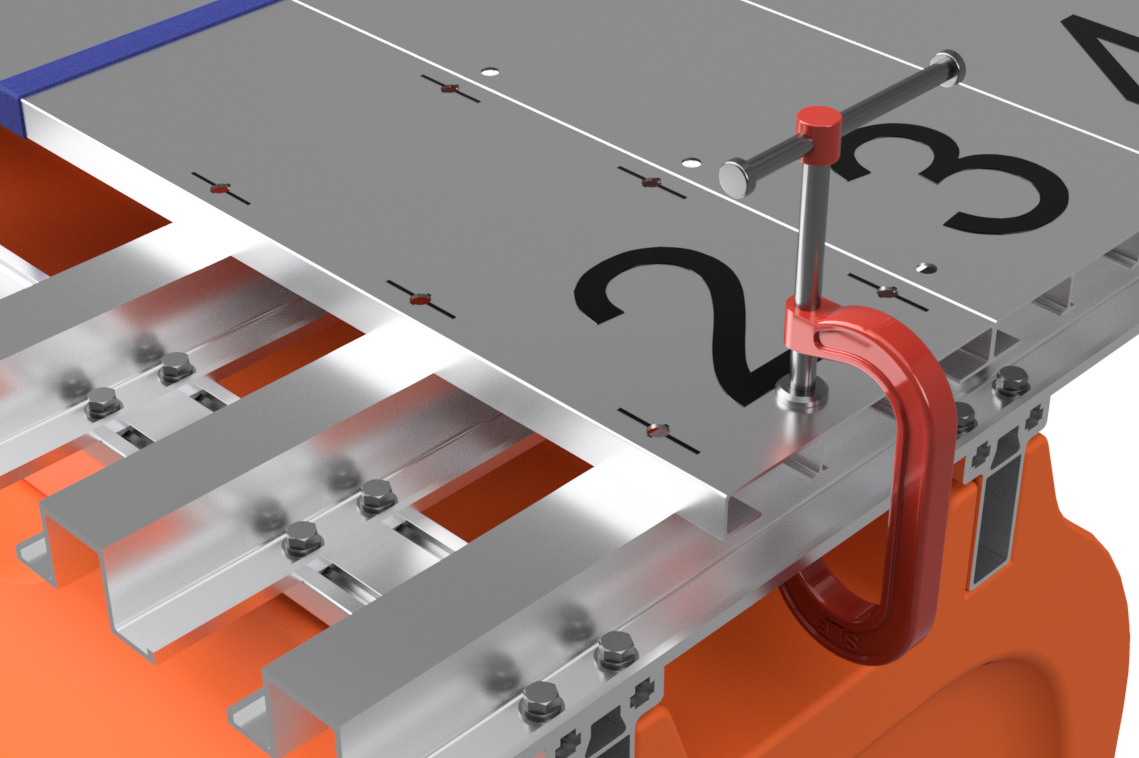
If you have a 7'4" wide deck, remove all the deck planks other than plank 6. If you have a 8' wide deck, remove all but deck plank 6 and 7. If you have a single-nose pontoon boat or blunt work platform, align the end of the plank or planks on the vessel with the front square tube crossmember (square tube on either end of blunt work platforms). If you are working with a dual-nose boat kit, align the planks with the end of your frame (lower edge of hat channel on one end of the vessel). A square is required for alignment on dual-nose boats and blunt work platforms. Adjust the placement of the plank or planks so that they are centered left-to-right on your frame, square to the crossmembers (compare to front and rear crossmembers), and clamp the plank or planks into position. Double check your measurements as the central planks determine placement of all the other deck planks.
|

|
|
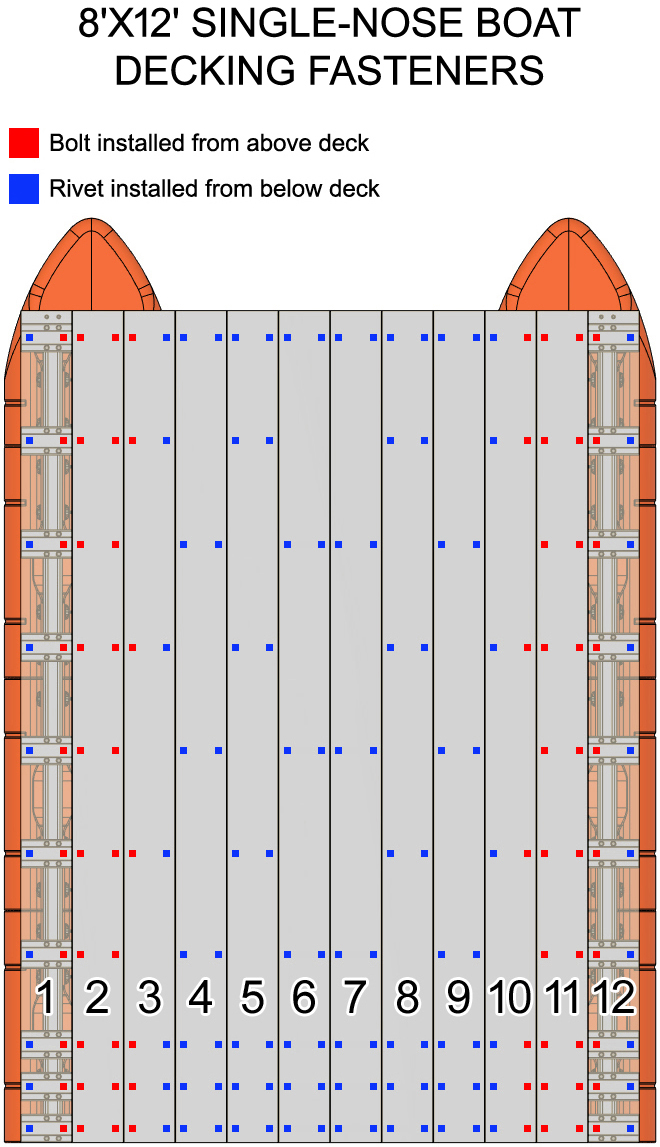
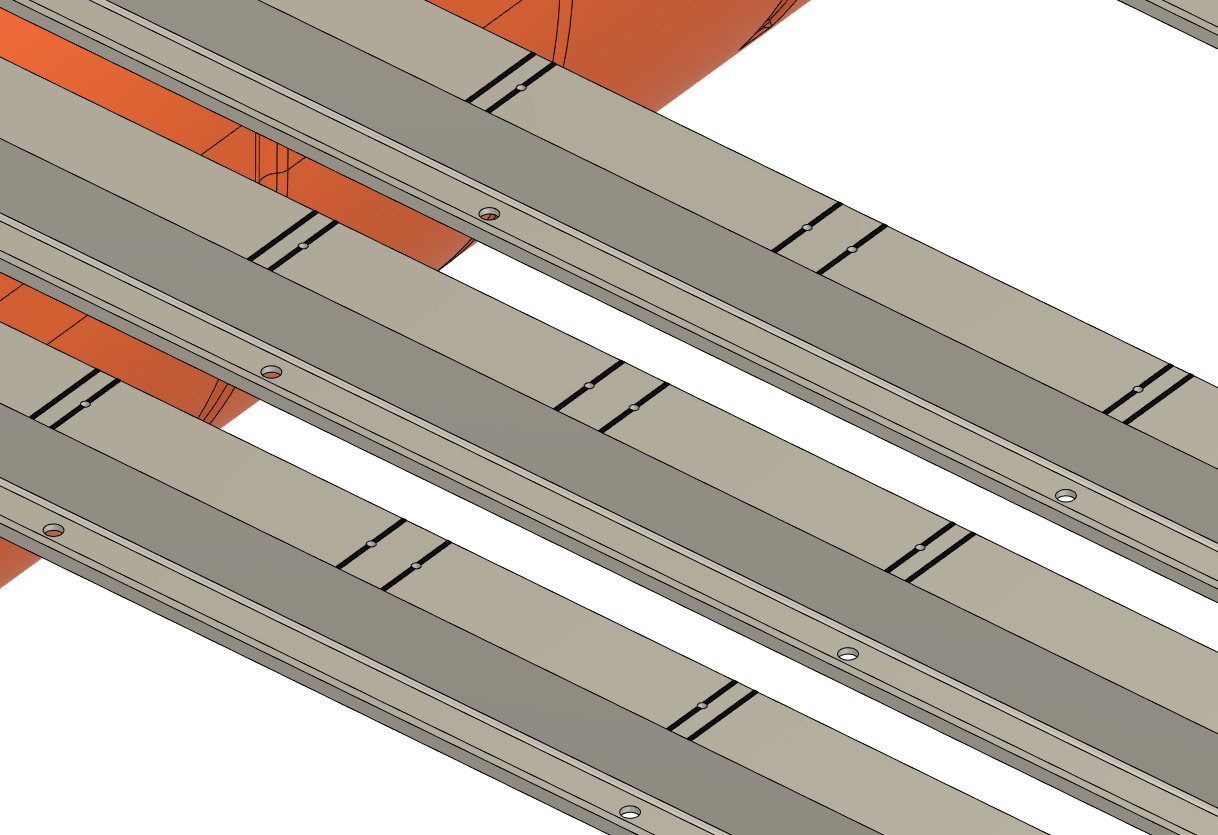
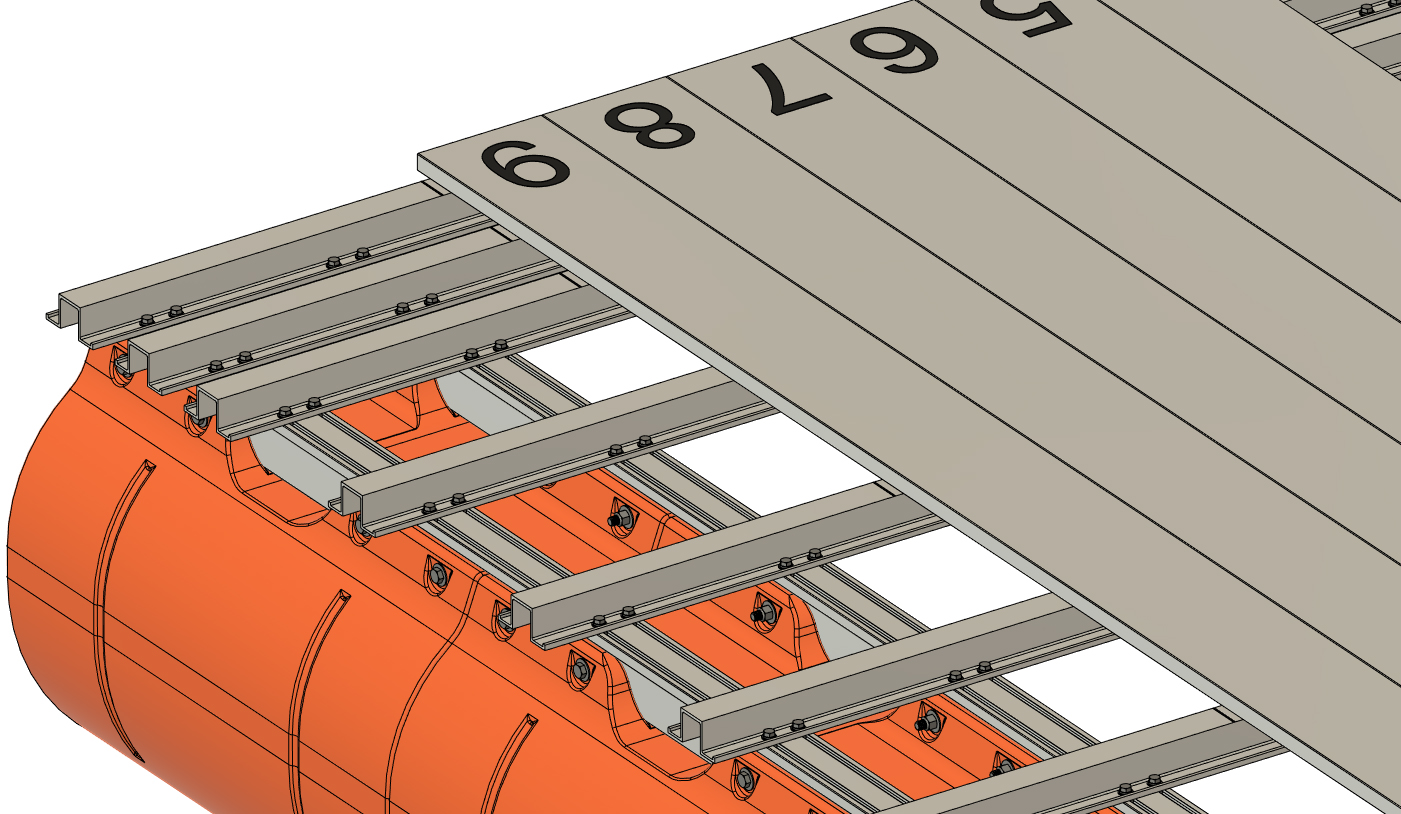
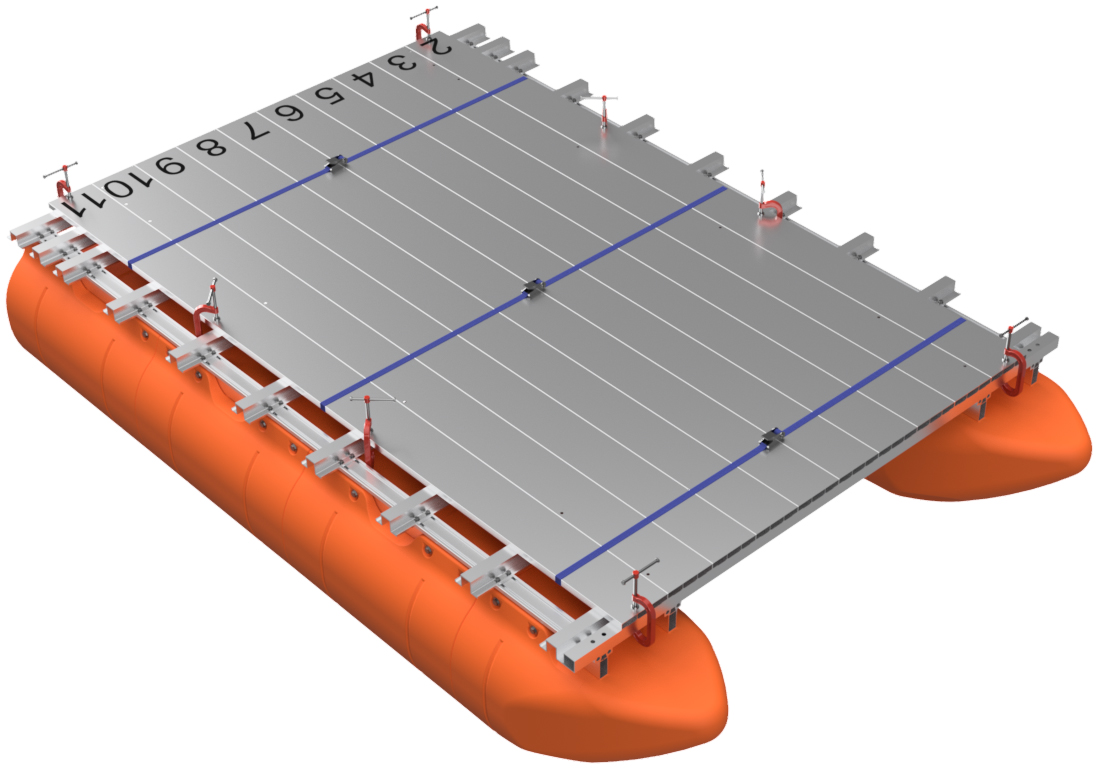
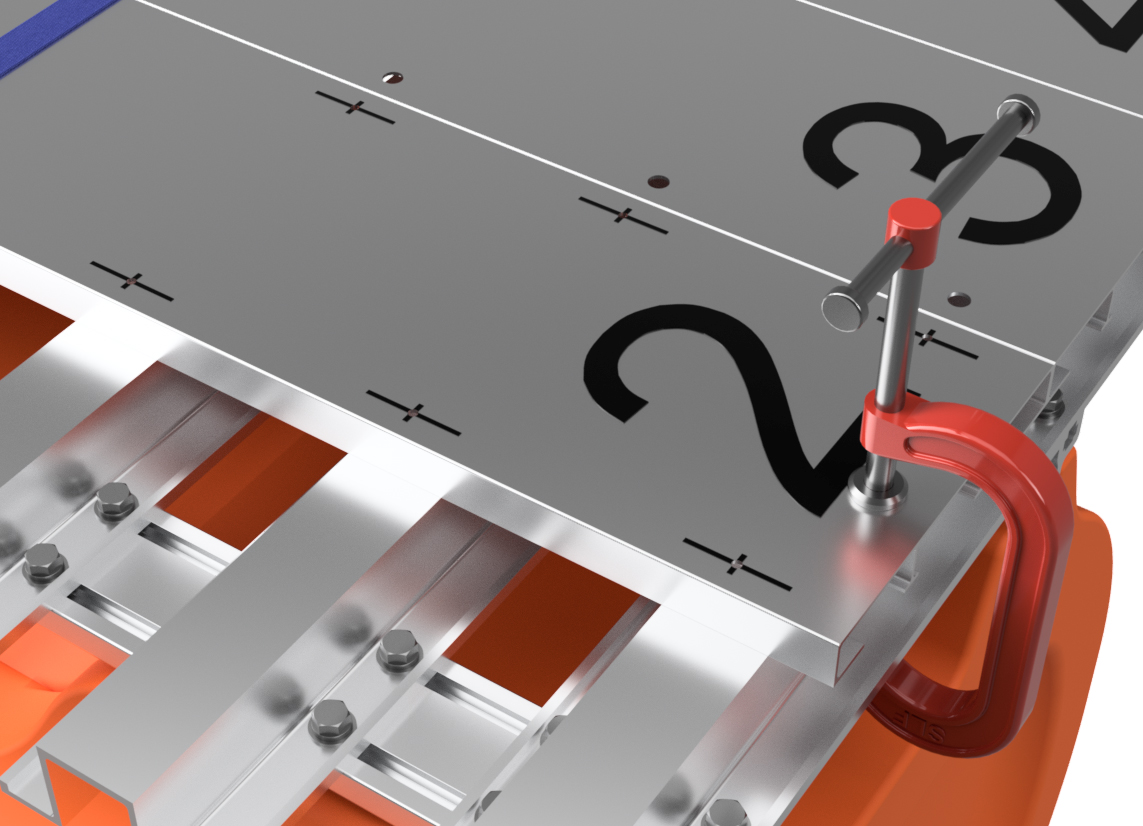
DECKING FASTENER DIAGRAMS:
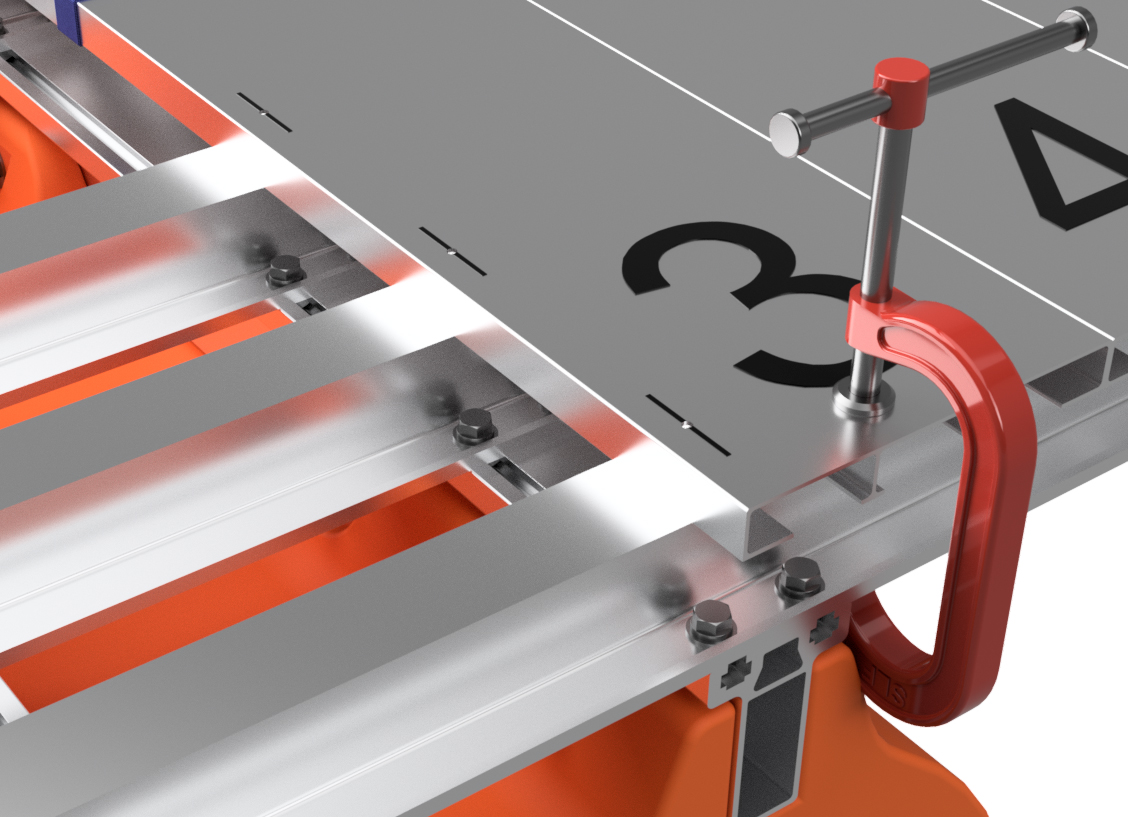
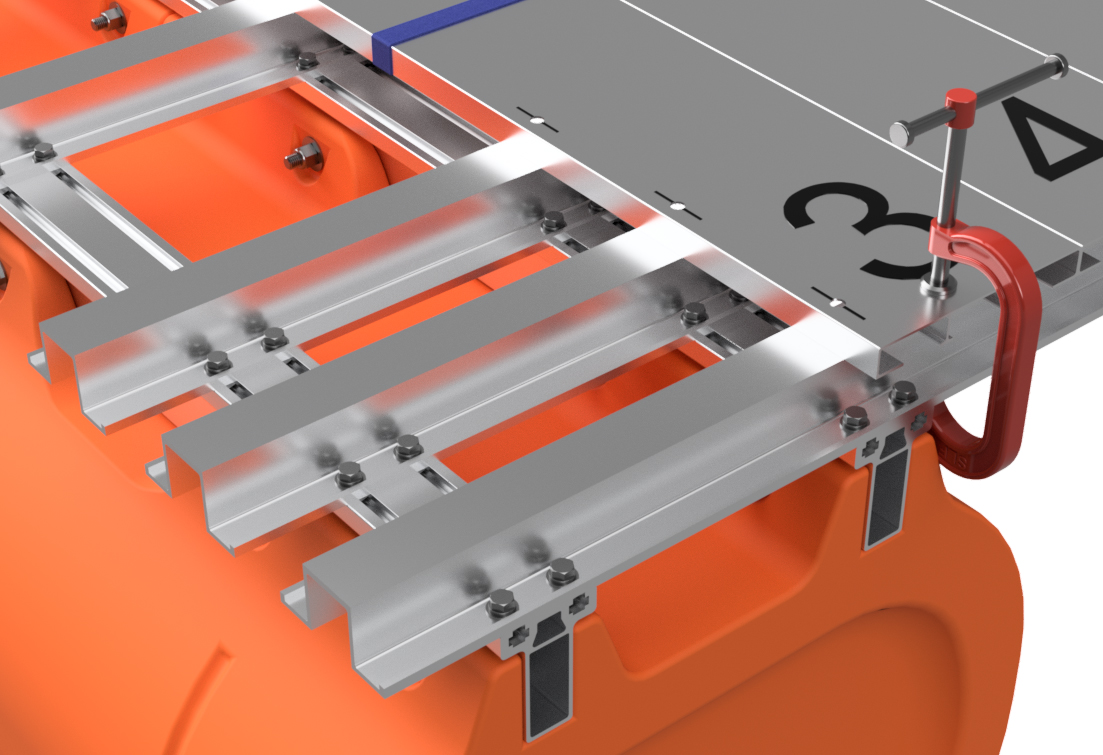
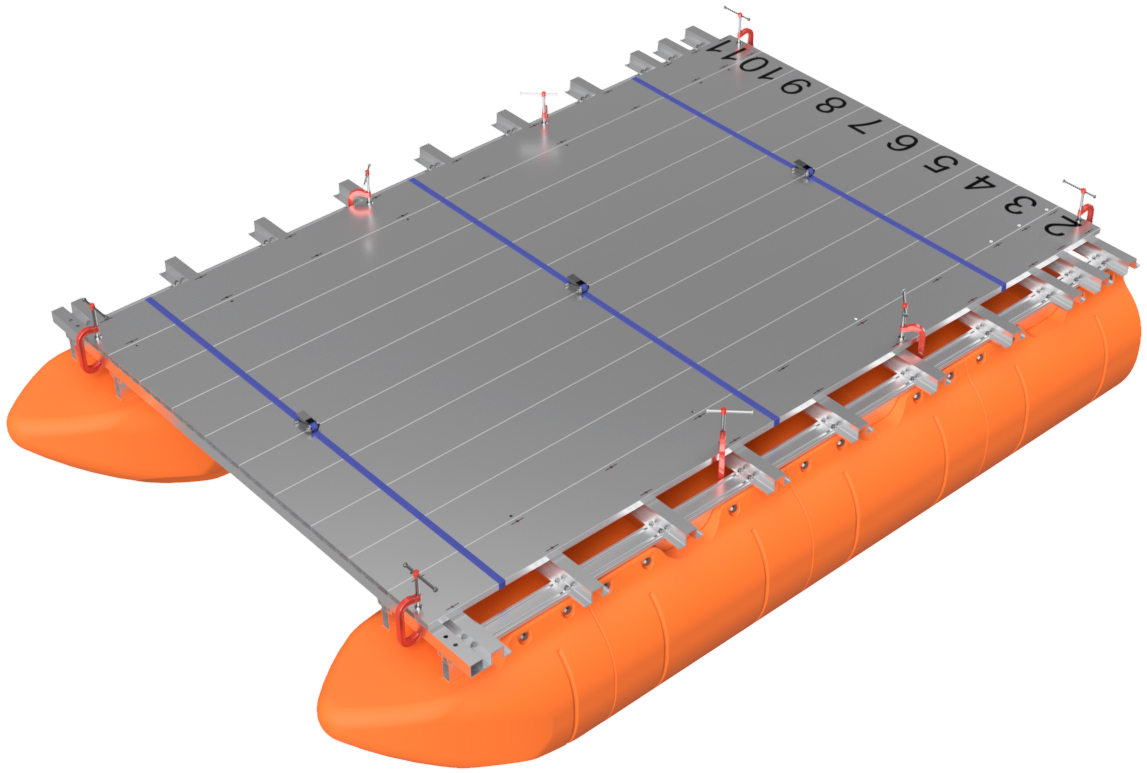
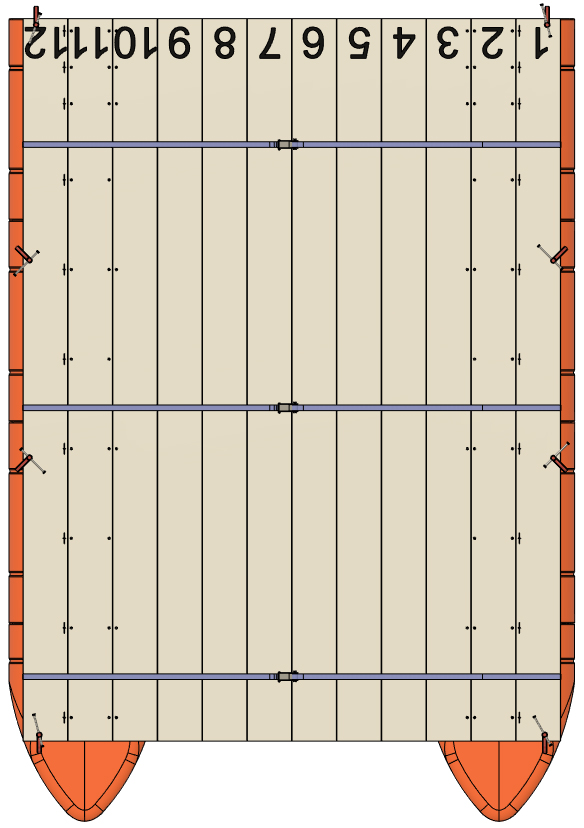
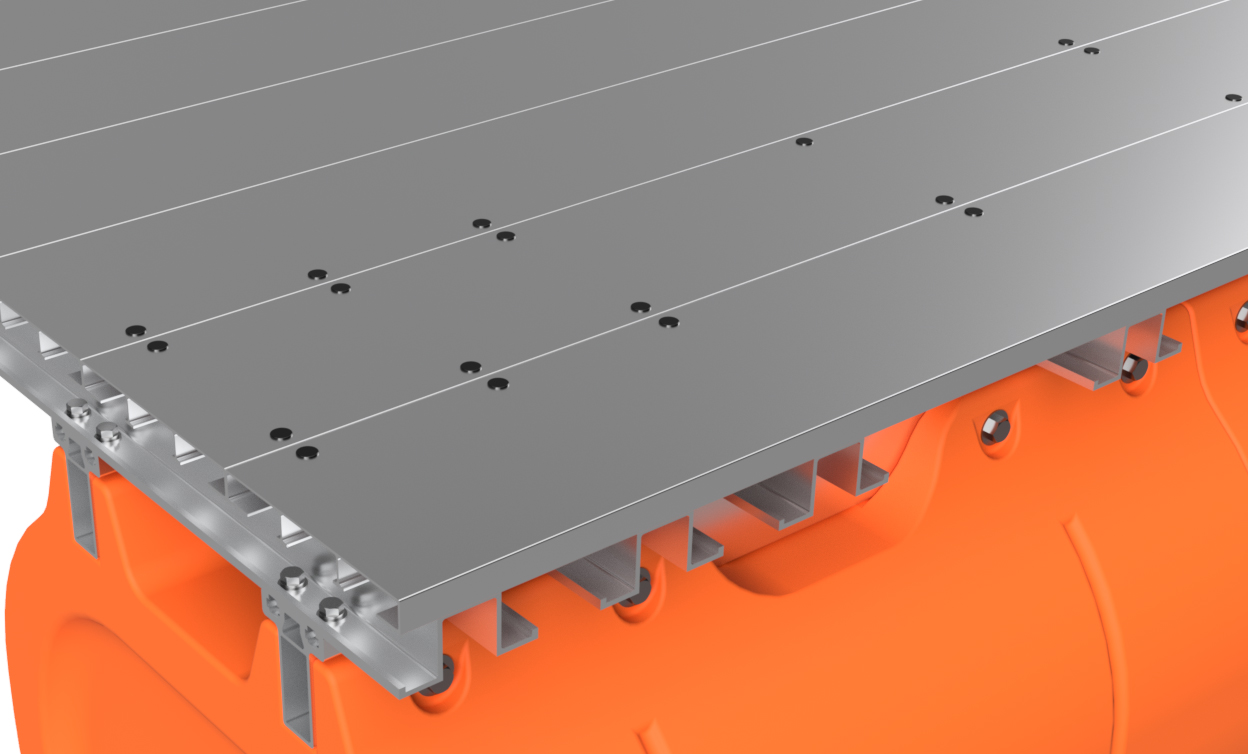
Before moving onto step 3, find your boat kit listed below and click on the link to view the required decking fastener diagram. If possible, print the diagram or have it handy on a mobile device as you will need to reference it throughout the rest of the installation process. On your diagram, there are blue and red squares (we call them dots in some places) and the color of the square indicates which fastener to use and where it goes. You will note that the two outermost planks on either side of all the kits have fasteners going through every crossmember, but inner deck planks have staggered fastener positions. Following the applicable diagram is very important, and ensures that your boat's frame retains it's full strength when completed. Remember, you can't undrill holes, so take your time and be certain that you're following your diagram. If you print your diagram, it's easy to check off fasteners and planks as you go.
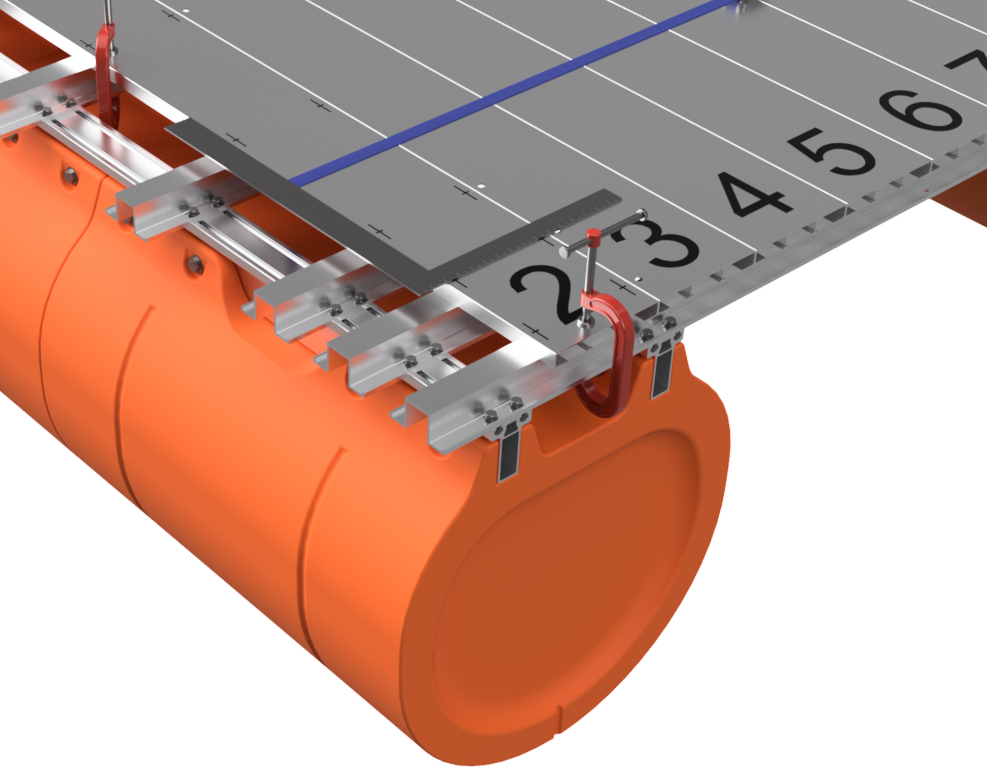
For those with single-nose boat kits and blunt-end work platforms, you will NEVER drill into a square tube crossmember. Dual-nose boat kits do not have square tube crossmembers. Single-nose pontoon boat kits: 7'4"x15' single-nose boat kit - ONLY FOR KITS WITH 6 HP TRANSOM 8'x15' single-nose boat kit - ONLY FOR KITS WITH 6 HP TRANSOM Dual-nose pontoon boat kits: Blunt-end work platform and swim raft kits: 8'x8' blunt work platform and swim raft kit 7'4"x9' blunt work platform kit |
|
|
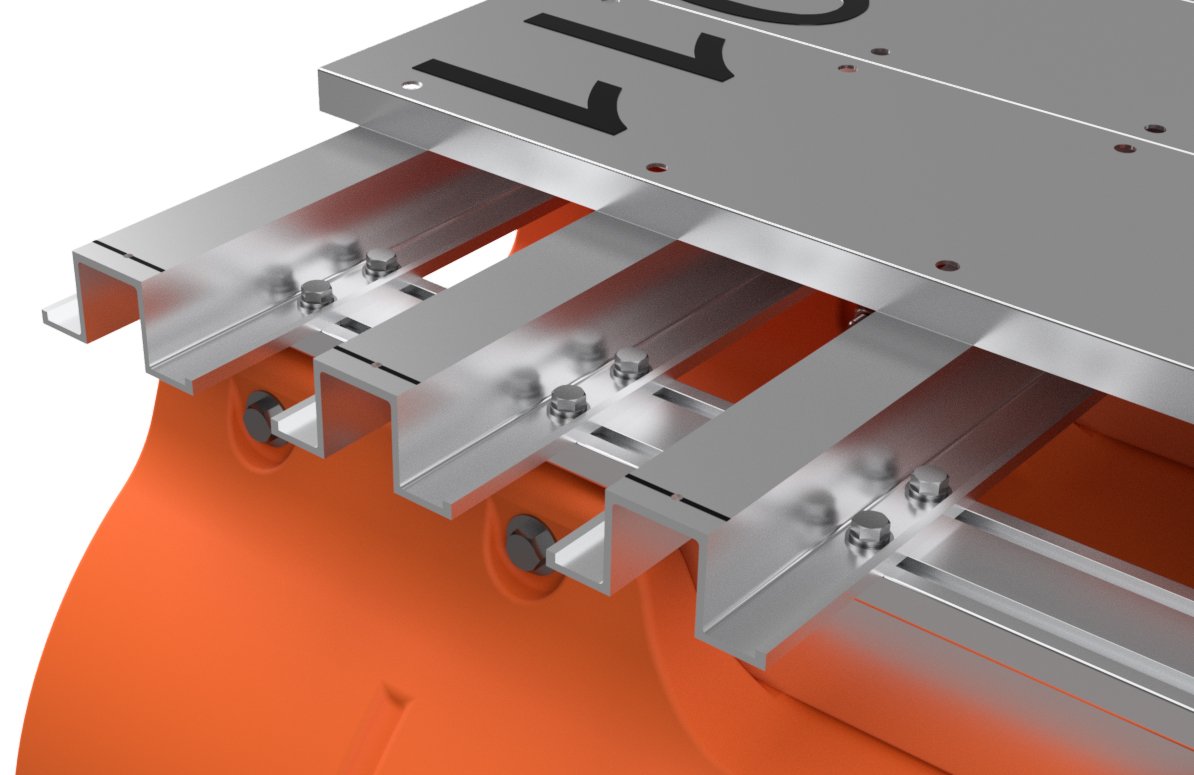
STEP 3
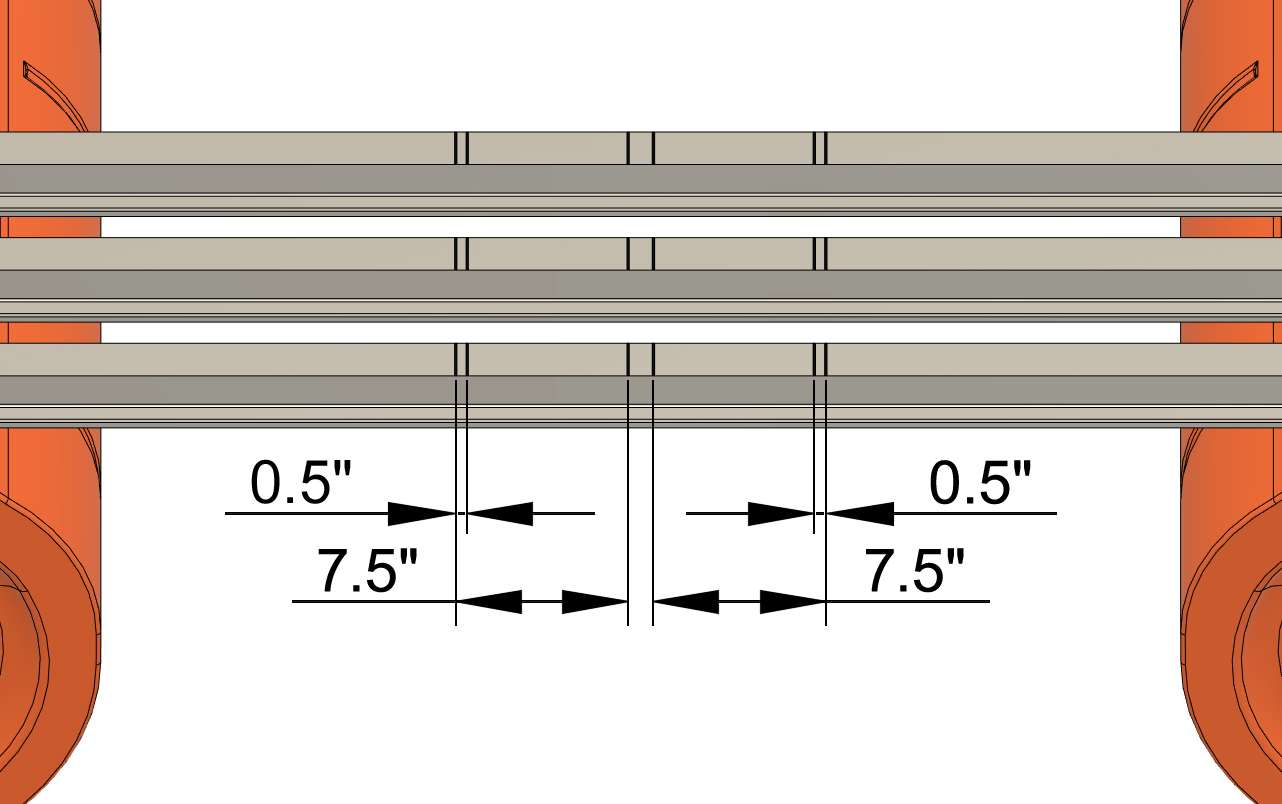
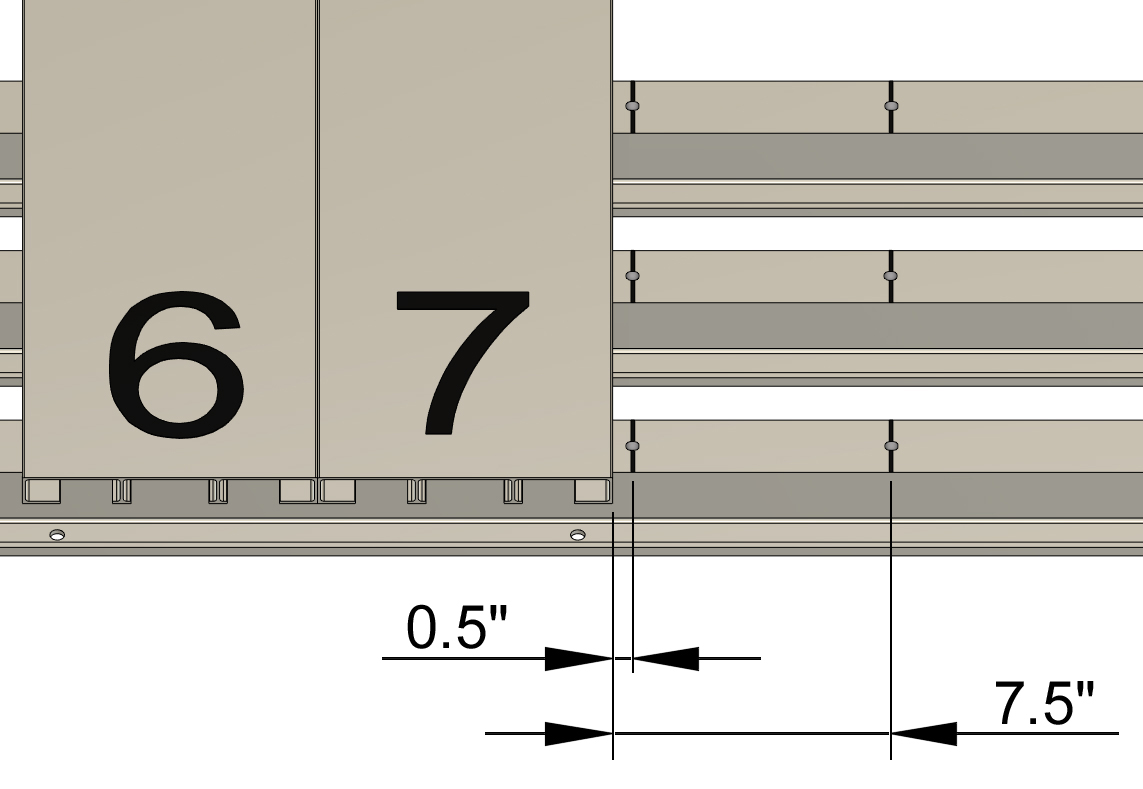
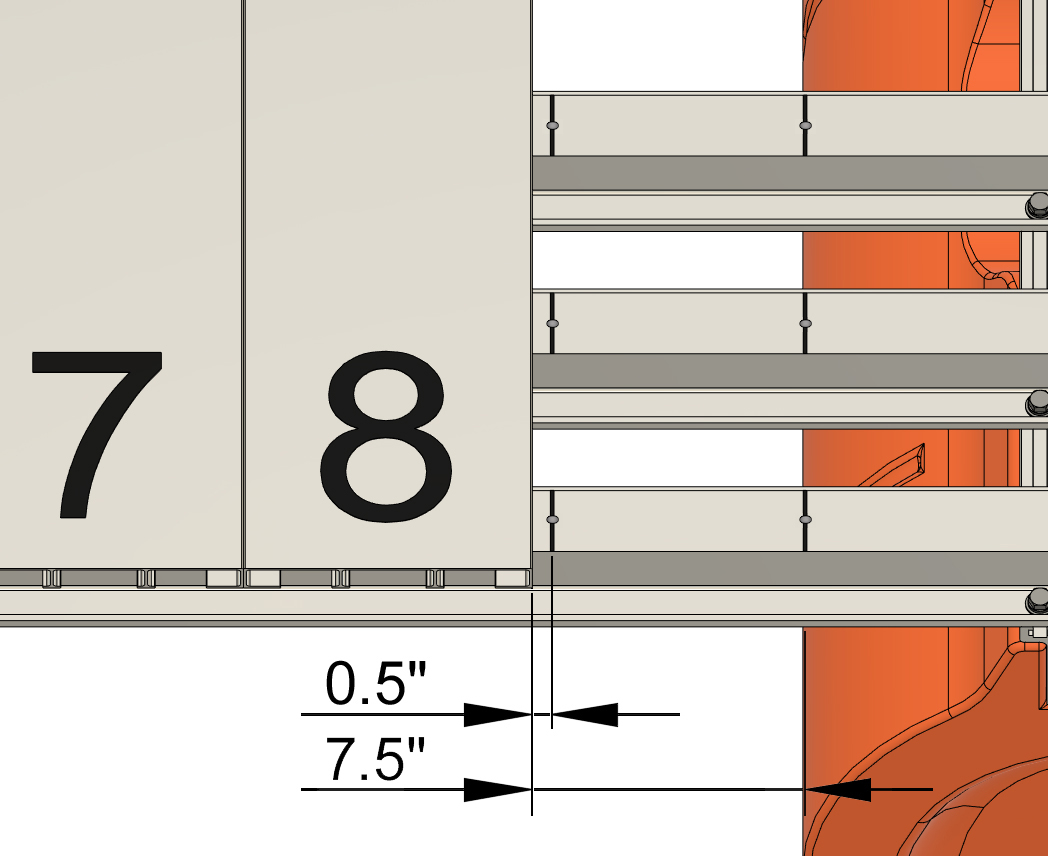
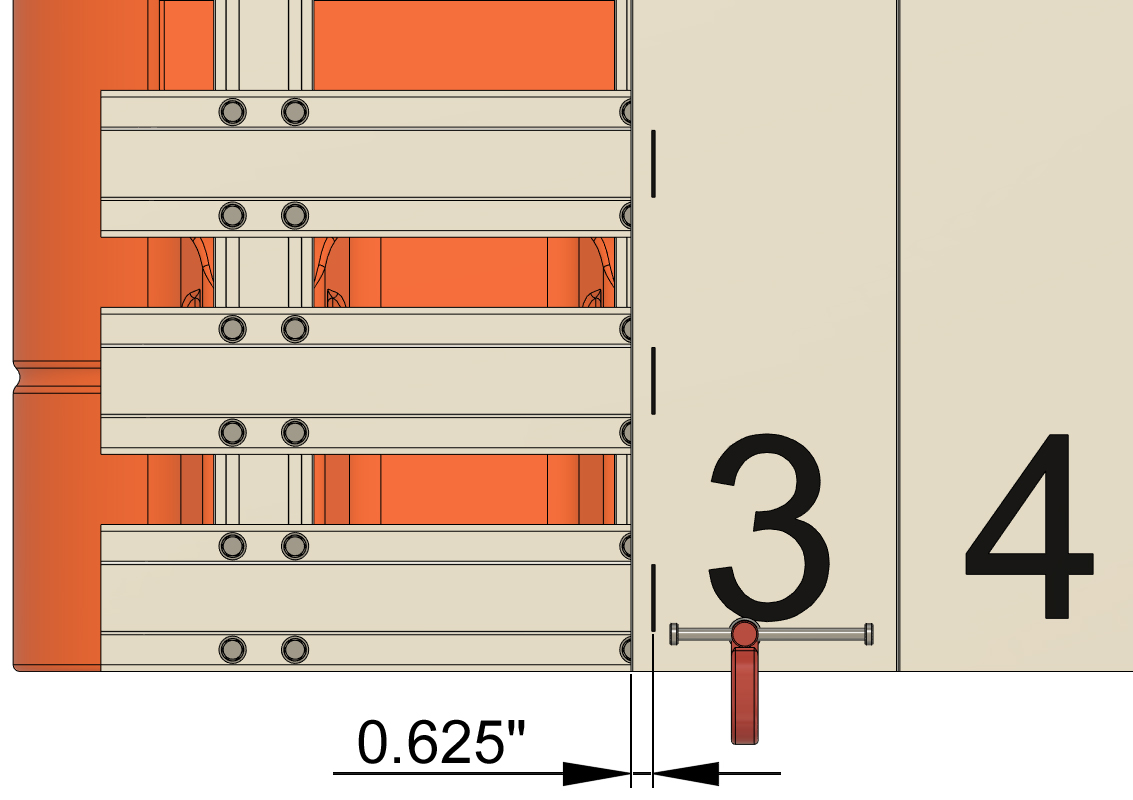
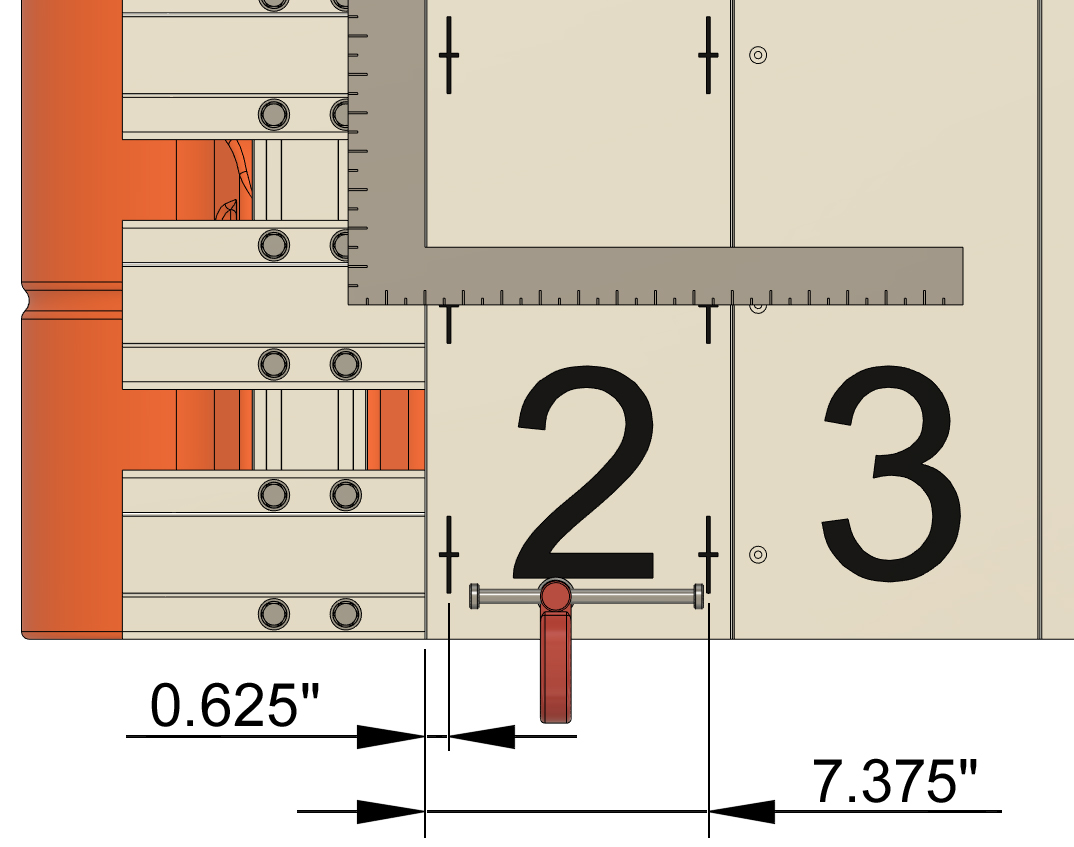
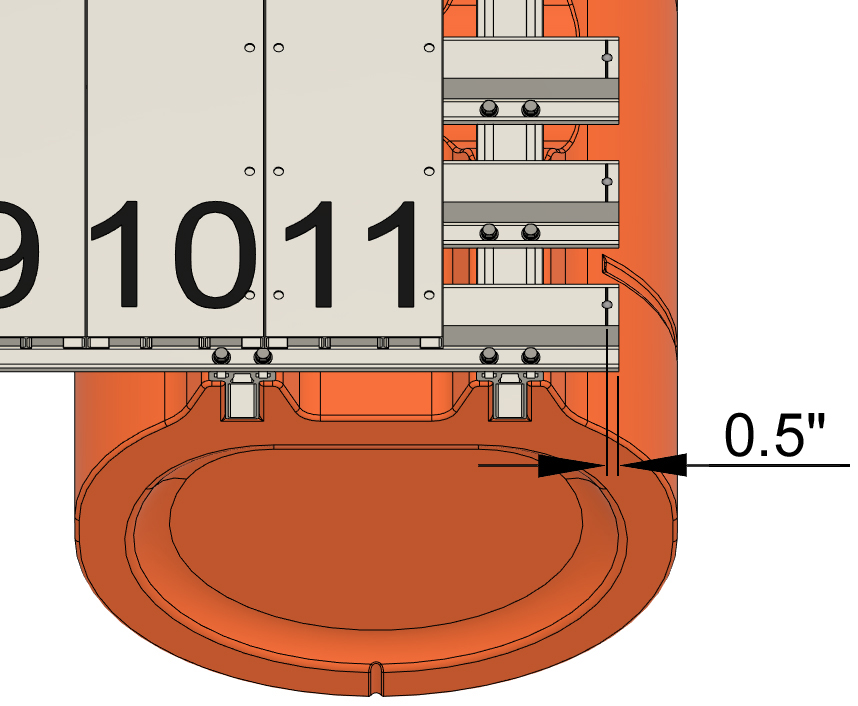
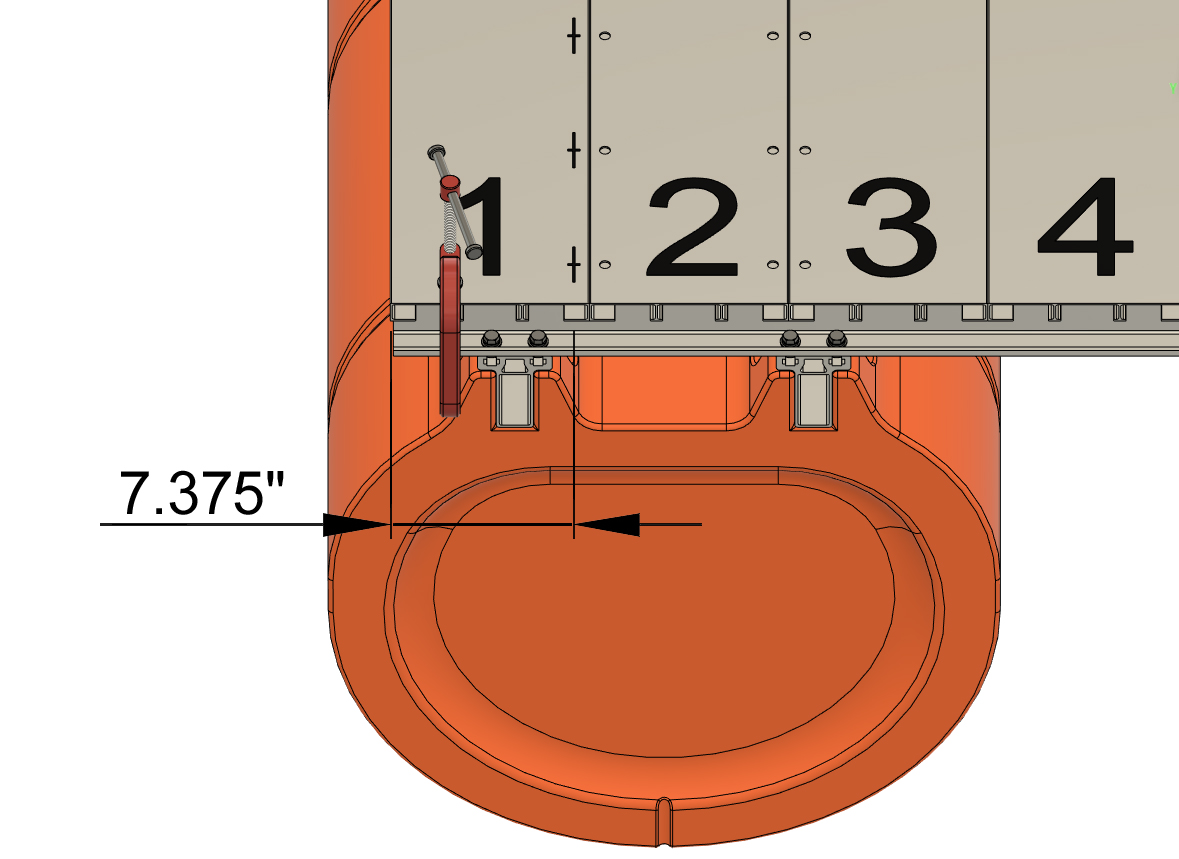
Using a marker, reference your decking fastener diagram and make a line on the frame crossmembers against the deck plank or planks that are clamped to your boat. Once again, not every crossmember gets rivets, so not every crossmember gets a line. With 8' wide boat kits, draw your lines along the edges of deck planks 6 and 7. With 7'4" wide kits, draw your lines along deck plank 6 which is clamped to your frame.
Remove the deck plank or planks from the frame. If you are working on a 8' wide boat, draw a line 1/2" and 7 1/2" inward from the lines you just drew on the crossmembers as shown in the diagram to the right. If you are working on a 7'4" wide boat, draw a line 1/2" in from the lines drawn against the edge of the plank.
|

|
|
STEP 4
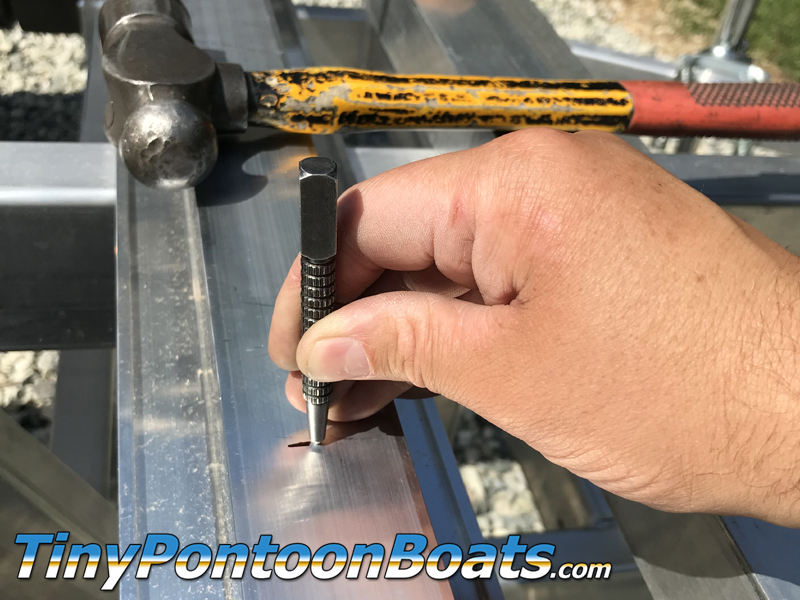
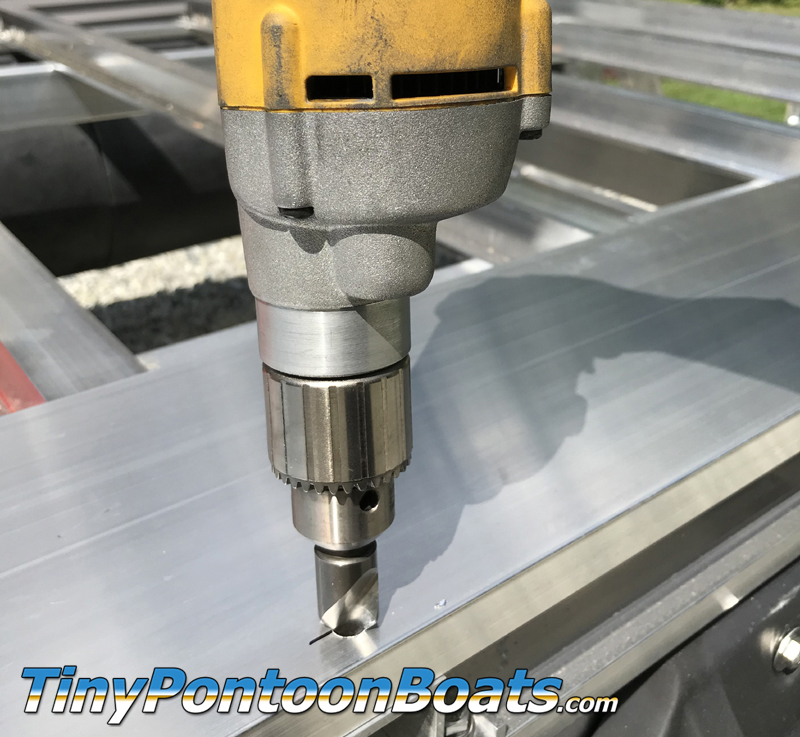
Use your center punch and a hammer to make a small divot in the center of the lines you drew in the second part of step 3. Use your 11 gauge (0.191" diameter) drill bit to drill through each cross member where you just marked with your punch. Debur your new holes.
PLEASE SEE THE SECTION BELOW FOR A NOTE ON DEBURRING.
|
|
|
DEBURRING HOLES
During your assembly, you will be drilling a ton of small holes. It is very important to debur each hole that you drill. Be certain to debur holes you drill in crossmembers and deck planks as mating surfaces can't have anything between them. When we build boat kits here at Tiny Pontoon Boats, we like to use a small countersink drill bit to debur holes (listed in the "REQUIRED TOOLS" table above), but you can also use a little bit of sand paper or a file. We will not stress the importance of this step again, but deburring is very important during this process.
|
|
|
STEP 5
Place the center plank or planks back onto the top of the frame and line them up with the lines you drew at the start of step 3. Clamp the plank or planks into position and verify that they are placed as described in step 2. Double check your measurements and add additional clamps about 1/3 of the way in from the ends of the boat as shown.
From under the boat, using your 11 gauge drill bit, drill through the holes you just drilled in the cross members and drill through the bottom of the aluminum deck planks. Remember, you're only drilling through the bottom flanges on the plank(s). DO NOT DRILL THROUGH THE TOP OF THE PLANK(S). Remove the plank(s), debur the holes in the deck plank(s), and clamp your central plank(s) back into position. From under the boat, install a rivet. If using a powered rivet gun, pull down on the deck plank and then install the rivet. If you are using a manual rivet installation tool, move a clamp to that location before installing the rivet to ensure that the plank is securely pressed against the crossmember. This is important to do each time a rivet is installed. 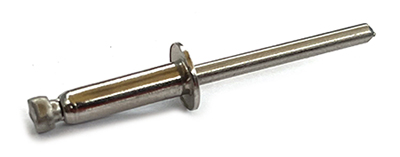 |
|
|
STEP 6
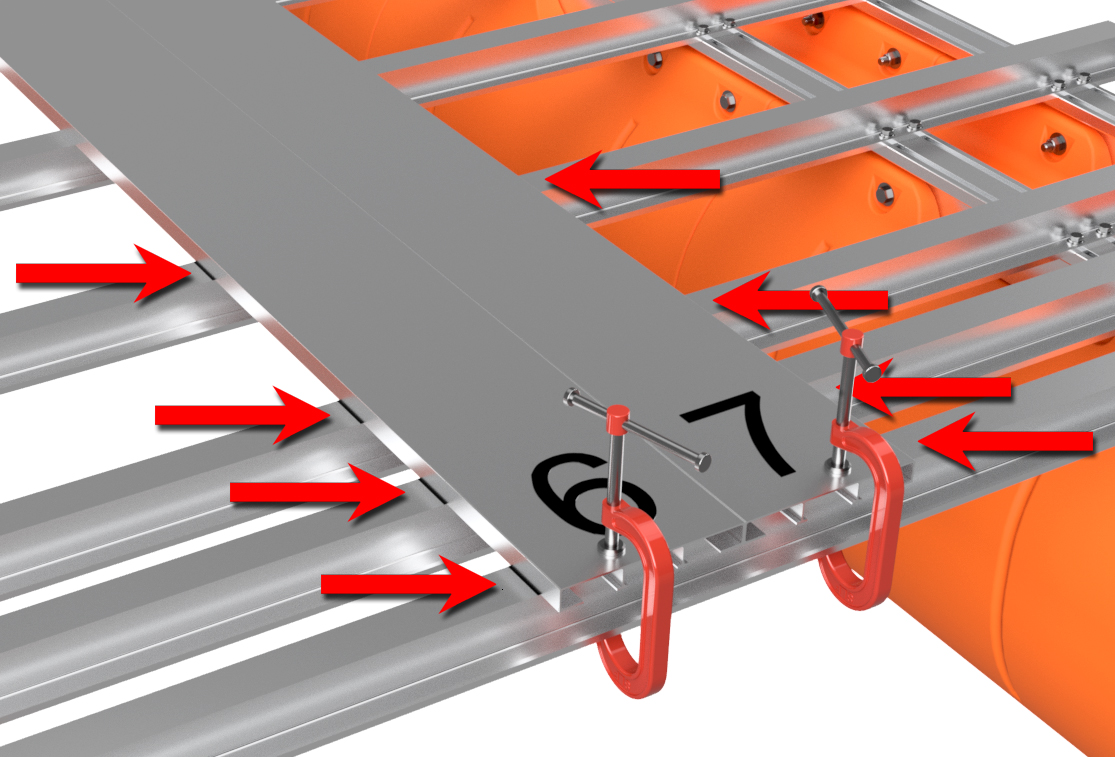
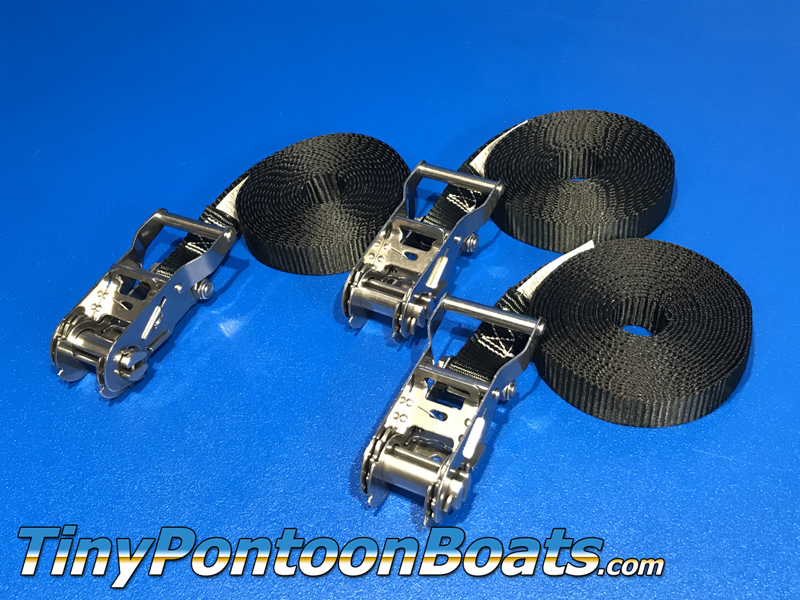
Referencing your decking fastener diagram, make a mark 1/2" and 7 1/2" from the outer edges of the plank(s) installed in step 5. Center punch these locations in the middle of the cross member and drill through with your 11 gauge drill bit. Debur the holes. Place the next two deck planks on your frame next to the installed central plank(s). Place 3 ratchet straps all the way around the deck planks. Gently tighten the ratchet straps so that the sides of the unfastened planks are securely together, but the plank doesn't bulge upward. The bottom of the plank should remain securely against the crossmembers. You will need to use a rubber or plastic mallet, or a steel hammer with a block of wood, to tap the inner edge of planks down against the frame.
From under the vessel, using your 11 gauge drill bit, drill through the holes you just drilled in the cross members and through the bottom flange of the deck planks. Remove the planks, debur holes, and clamp and strap the planks back in position on the boat. Rivet the planks in place from under the vessel.
|
|
|
STEP 7
Repeat step 6 with the next deck planks out. If you have a kit with a 8' wide deck, you'll be installing planks 4 and 9. If you're building a kit with a 7'4" wide deck, you'll be installing planks 4 and 8.
|
|
|
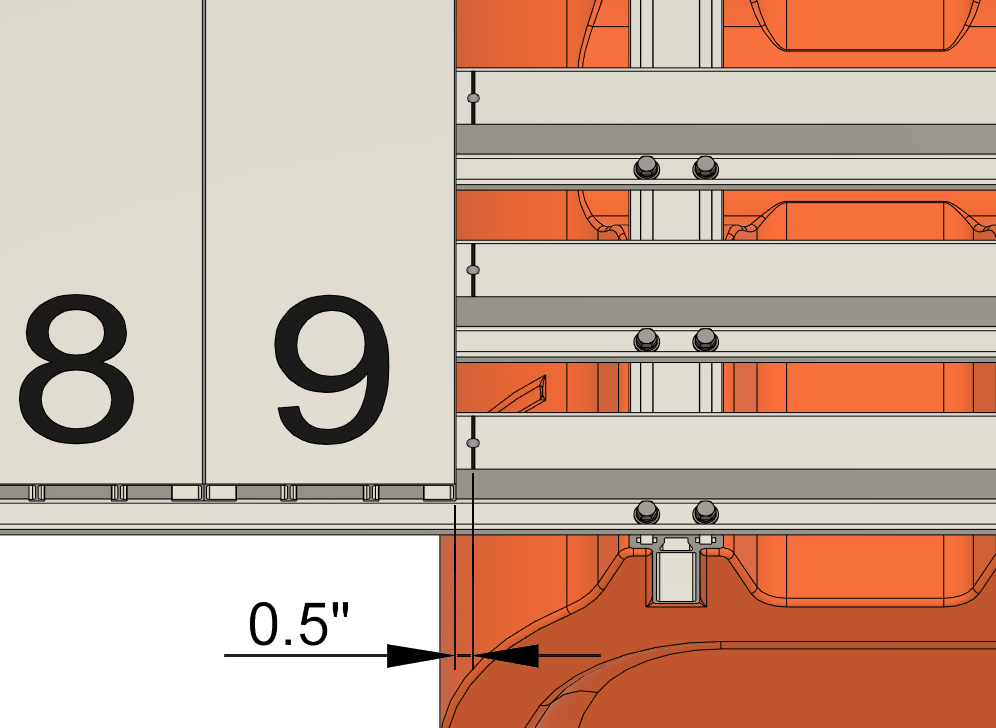
STEP 8
We're now onto a pair of planks that get fastened from both under and above the vessel. Referencing your decking fastener diagram, draw a line 1/2" away from the planks installed in the last step on the crossmembers that get rivets. Center punch and drill holes with your 11 gauge drill bit at the center of the drawn lines. Debur the holes.
|
|
|
STEP 9
Place the next two planks onto your frame system. If you're working on a kit with a 8' wide deck, you'll be placing planks 3 and 10. If you're working on a kit with a 7'4" wide deck, you'll be placing planks 3 and 9. Clamp and ratchet strap the planks against the installed planks.
Referencing your decking fastener diagram, draw a line on the surface of the unfastened planks in the locations indicated. The lines are to be 5/8" from the outer edge of each plank. Centered above your crossmembers, center punch and drill all the way through the deck plank (top and bottom) and directly through the top of your hat channel crossmembers with your 1/4" drill bit.
|
|
|
STEP 10
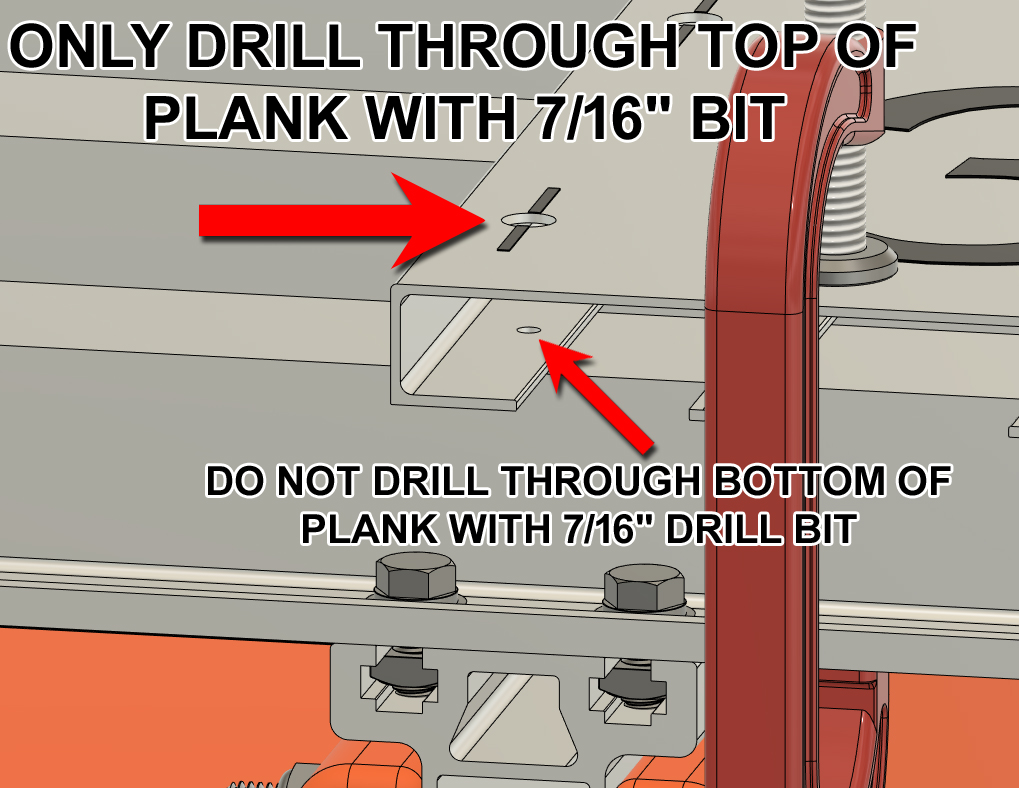
Using a 7/16" diameter drill bit, drill through ONLY the top of the deck planks where you drilled holes in step 9. DO NOT DRILL THROUGH THE BOTTOM FLANGE OF YOUR DECK PLANKS WITH YOUR 7/16" DRILL BIT.
From under the vessel, using your 11 gauge drill bit, drill through all the holes you drilled in the hat channel crossmembers in step 8, and through the bottom flange of the deck planks. Remove the clamped-on planks, debur the new holes, and clamp and ratchet strap the planks back into position. From under the boat, rivet the planks through the new holes drilled from under the vessel in this step.
|
|
|
STEP 11
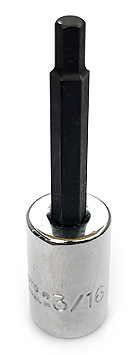
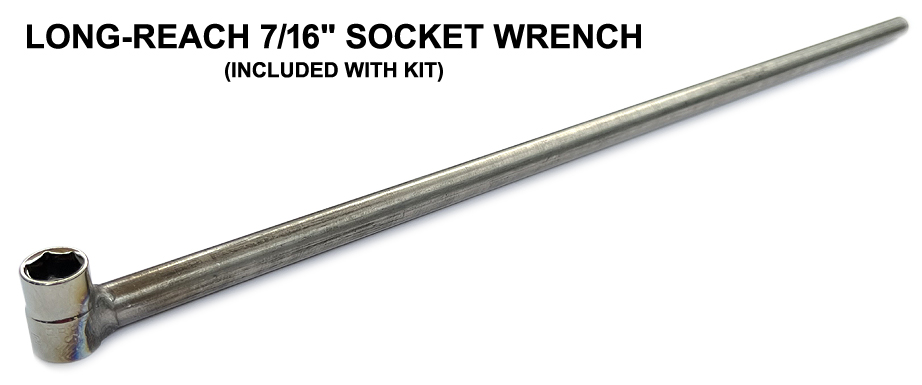
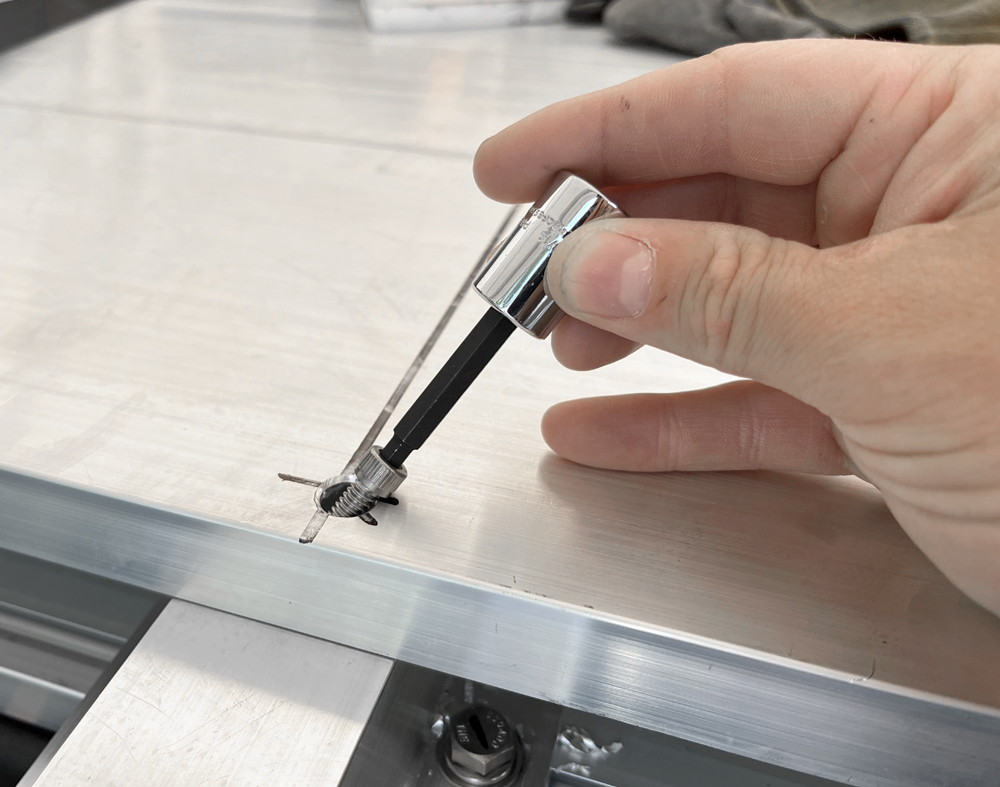
This step requires use of the long-reach 7/16" socket wrench that is included with your decking hardware kit. If you purchased multiple boat kits at the same time, you will only receive one of these wrenches. This wrench is for installing the 1/4" flange lock nuts from the underside of the crossmembers. The remaining portion of the decking installation is MUCH easier if working as a 2-person team.
From above the vessel, insert 1/4" x 3/4" Allen bolts through each of the 7/16" holes and into the 1/4" holes you drilled in step 9. The recommended 3/16" hex driver makes this task easy. Using your long-reach 7/16" socket wrench and your 3/16" hex driver (Allen driver), install a nut on each of the bolts. Your helper will be under the boat to line up the nuts with the special socket wrench. Remove the clamps and ratchet straps. 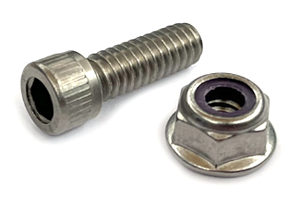
|
|
|
STEP 12
Clamp and strap the next two planks onto your vessel. These are planks 2 and 11 if building a kit with a 8' wide deck, and planks 2 and 10 if building a 7'4" wide boat. These planks get bolted in place from above the boat (both sides of the plank) and you'll be bolting to every hat channel crossmember.
Above every hat channel crossmember, on the surface of the unfastened planks, draw a line 5/8" and 7 3/8" inward from the outer edge. Use a square to mark the center of the hat channels (visual alignment is fine for this) and center punch at each of the X marks you just drew. Use your 1/4" drill bit to drill all the way through the deck plank and through the top of the hat channel crossmembers as shown.
|
|
|
STEP 13
Use your 7/16" drill bit and drill through the top surface of the deck planks where you drilled in step 12. As before, ONLY DRILL THROUGH THE TOP OF THE DECK PLANKS. Remove the clamped-on planks, debur the new holes, and clamp and strap the planks back into position. Install 1/4" x 3/4" Allen bolts and flange lock nuts in each of the new holes as you did in step 11. Remove the clamps and straps.
|
|
|
STEP 14
Now onto the last pair of deck planks. These two planks are fastened from both above and below the deck. The inner row of holes receives bolts from above the deck and the outer row of holes receives rivets from under the deck. These planks are fastened to every hat channel crossmember.
On each hat channel crossmember, draw a line 1/2" in from the end of the channel. Center punch and drill through the center of each hat channel crossmember with your 11 gauge drill bit. Debur the new holes.
|
|

|
STEP 15
Clamp and strap the last two deck planks onto your vessel.
The outer edges of the planks on 8' wide decks WILL EXTEND BEYOND THE CROSSMEMBERS of the boat by 1/8" to 3/16". This is normal. The planks may extend up to 1/8" beyond the edges of 7'4" wide boats as well, depending on how much you've compressed the planks during installation. Use a square and mark a line 7 3/8" in from the outer edge of the two clamped-on planks. Use your square to mark the center of the hat channels on your first set of marks. These new marks will line up with the 7/16" holes you drilled before. Center punch and drill at your marks with your 1/4" drill bit and go all the way through the planks and hat channels below. At the new hole locations, drill through the top surface of your deck planks with your 7/16" drill bit. ONLY DRILL THROUGH THE TOP OF THE DECK PLANKS WITH YOUR 7/16" DRILL BIT. From the under side of the hat channels, using your 11 gauge drill bit, drill through the small holes that you drilled in step 14, and drill through the bottom flanges of the deck planks. DO NOT DRILL THROUGH THE TOP OF THE PLANKS WITH YOUR 11 GAUGE DRILL BIT. Remove the clamps and straps and debur all the new holes. Clamp and strap the planks back into position.
|
|
|
STEP 16
Install Allen bolts and flange lock nuts into the inner rows of holes from above the boat and install rivets into each of the outer rows of holes from the underside of the hat channels. Remove the clamps and straps.
|
|
|
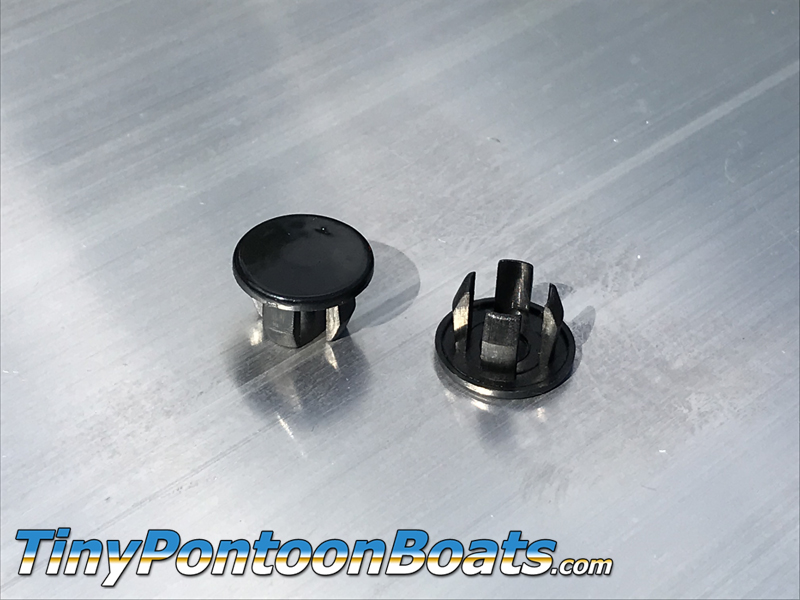
STEP 17
If you are NOT intending to install carpet or vinyl flooring, press a 7/16" plastic plug into each of the 7/16" holes in the top of the deck. If you are installing carpet or vinyl flooring, the plugs are not required. If you are keeping the deck bare, use a little bit of lacquer thinner and wipe off all the numbers and markings you drew on the deck planks.
Your decking installation is complete!
|
|